How to Take Tiles off Kitchen Wall: Easy Steps for a Flawless Removal
Updating your kitchen doesn’t require a full professional overhaul—removing outdated or damaged wall tiles is a manageable DIY project that cuts renovation costs and lets you customize your space exactly how you want. Whether you’re prepping for a new backsplash, fixing water damage behind the sink, or just tired of an old tile design, following a structured, safety-first process will save you hours of repair work and leave your wall smooth and ready for its next finish. This 2026-updated guide covers often-overlooked steps like hidden utility checks and substrate assessment to ensure a flawless removal, no prior experience required.
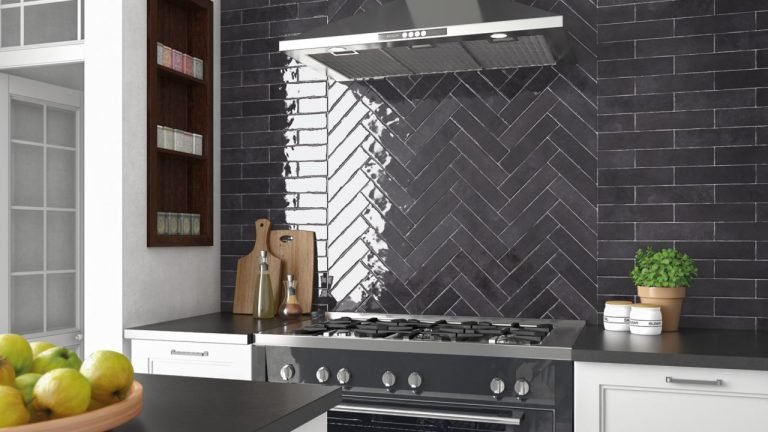
 A classic herringbone tile backsplash, a popular style many homeowners remove during kitchen renovations.
Credit: www.create-enjoy.com
A classic herringbone tile backsplash, a popular style many homeowners remove during kitchen renovations.
Credit: www.create-enjoy.com
Pre-Removal Assessment
Skipping this initial check is the most common cause of unexpected delays and damage during tile removal. Taking 15 minutes to assess your wall first will streamline the entire process and help you avoid costly repairs later. For more on this, see our guide on how to regrout kitchen wall tiles easy steps.
Check for Hidden Utilities
Before you grab a chisel, locate all water lines, electrical wiring, and gas pipes running behind the tile area. This is especially critical for tiles installed behind sinks, stoves, or range hoods, where utilities are often routed through the wall cavity. Use a stud finder with utility detection to mark the location of pipes and wires, and label any shutoff valves you find for easy access later.
Identify Your Wall Substrate
The material behind your tile determines how much effort removal will take and how much repair you’ll need to do afterward. Most kitchen walls use one of three substrates:
- Drywall: The most common option for residential kitchens, installed after 2000. It’s soft and prone to damage if prying is too aggressive, so extra care is needed.
- Cement board: A durable, water-resistant option common in high-moisture areas like behind sinks. It holds up well to prying but may have thin-set mortar bonded tightly to its surface.
- Plaster: Found in homes built before 1950, it’s hard and brittle, so chiseling too hard can cause large chunks to break off.
Test a Small Area
Find an inconspicuous spot (like behind a cabinet or in a corner) to test your removal technique first. This will help you gauge how tightly the adhesive is bonded, confirm your substrate type, and adjust your approach before working on visible areas. For more on this, see our guide on how to take tiles off a kitchen wall.
Essential Tools & Safety Gear
Having the right tools on hand before you start will cut your removal time in half and reduce the risk of injury or wall damage. For 2026 DIY projects, prioritize tools designed for tile-specific work to avoid unnecessary frustration.
Non-Negotiable Protective Gear
Cutting and prying ceramic or porcelain tiles releases fine crystalline silica dust, which can cause permanent lung damage with repeated exposure. For official 2026 safety standards, refer to OSHA’s guidelines for silica control in construction projects. At minimum, wear:
- An N95 respirator mask (not a basic dust mask, which does not filter silica particles)
- Safety glasses with side shields to protect against flying shards
- Cut-resistant gloves to avoid cuts from sharp tile edges
- Long sleeves and pants to protect skin from scratches and dust irritation
For evidence-based guidance on safe DIY utility shutoff and PPE use, the University of Minnesota Extension shares free, up-to-date home improvement safety resources for homeowners of all skill levels.
Hand Tools for Precision
Hand tools give you control for detailed work around outlets, edges, and small tiles:
- Carbide-tip grout removal tool: Cuts through both standard and epoxy grout without dulling quickly
- 16-ounce claw hammer: Lightweight enough for controlled tapping, heavy enough to loosen stubborn tiles
- Cold chisel (1/2-inch width): Fits easily into grout lines for prying
- Putty knife with a 2-inch flexible blade: Slides under loose tiles without gouging the wall
- Thin wood shims (1/8-inch thick): Place between prying tools and the wall to prevent surface damage
Power Tools for Speed
For large backsplash areas or tiles installed with thick thin-set mortar, power tools will cut your labor time significantly:
- Oscillating multi-tool with a carbide-grit scraper blade: Cuts through even hardened epoxy grout in a single pass, saving hours of manual labor
- Rotary hammer with a 1-inch chisel bit: Ideal for breaking up thick, old adhesive on large surfaces
- Wet/dry vac: Collects dust as you work to reduce cleanup time and limit silica exposure
Prep Your Workspace & Utilities
Proper prep protects your kitchen’s existing finishes and keeps you safe during removal. Don’t skip any of these steps, even for small tile areas.
Clear and Protect Surroundings
Start by removing all items from countertops, open shelves, and the floor around the work area. If your wall-mounted kitchen faucet sits within the tile removal zone, take a few minutes to remove it first to avoid water damage and improve access to tight spots behind the fixture. Cover remaining countertops, floors, and cabinet faces with drop cloths or plastic sheeting, securing them with painter’s tape to prevent slipping.
Shut Off All Utilities
Turn off all utilities running to the work area before you start prying tiles:
- Water: Shut off the dedicated under-sink valves first, then the main home water supply if you’re working near a sink line. Open the faucet to drain any remaining water from the pipes to avoid leaks.
- Gas: If you have a gas range behind the tile area, turn off the gas supply at the shutoff valve behind the stove. If you’re unsure how to do this safely, contact your gas provider for assistance.
- Electricity: Flip the kitchen circuit breaker to the off position, then use a non-contact voltage tester to confirm no power is running to outlets or switches in the work area. Cover all exposed outlets and switch plates with plastic outlet covers to keep dust and debris out.
Remove Grout Lines First
Grout acts as a sealant that bonds tiles to the adhesive underneath, so removing it first is the easiest way to avoid chipped tiles and wall damage. Many DIYers skip this step to save time, but it will actually slow you down later by making tiles harder to pry loose.
Tools for Grout Removal
For standard cement-based grout (common in installations before 2015), a manual grout saw or utility knife works well. For epoxy grout (widely used in modern kitchen installs for its water resistance), you’ll need a carbide-tip grout removal tool, as standard steel blades will dull within a few passes.
Step-by-Step Grout Removal
Wear your safety glasses and gloves, then use your grout removal tool to scrape along the grout lines between tiles. Apply even pressure to avoid slipping and scratching the tile surface. Score the grout to a depth of 2-3mm—you don’t need to remove all of it, just enough to break the seal between the tile and the adhesive underneath. For tight spaces around outlets or edges, use a utility knife to carefully score the grout.
Clean Up Grout Dust
Vacuum or brush away all loose grout and dust from the wall before moving on to tile removal. Leftover grout can get trapped under tiles as you pry them, leading to uneven prying and wall gouges.
Detach Tiles Without Damaging Your Wall
Once grout is removed, tiles will pry loose easily with minimal force. Work slowly and check your progress frequently to avoid damaging the substrate underneath.
Hammer and Chisel Technique
Start at the bottom row of tiles, as these are installed first and have no tiles stacked on top of them, making them easier to pry loose. Place the cold chisel at a 45-degree angle in the grout line at the edge of a tile, then tap gently with the hammer. If you hear a hollow sound when tapping the tile, it’s already loose; a solid thud means the adhesive is still bonded, so apply a small amount of heat or adhesive remover first before prying. Work your way up the wall, tapping along the edges of each tile until it pops loose.
Pry Bar Best Practices
For tiles that are already partially loose, a pry bar gives you extra leverage to lift them without excessive hammering. Slide the flat end of the pry bar under the tile edge, then gently rock it back and forth to loosen the tile. Always place a thin wood shim between the pry bar and the wall to distribute pressure and avoid gouging the substrate. Never use a pry bar directly on drywall or plaster, as it will dent or crack the surface immediately.
Working Around Outlets and Fixtures
For tiles around electrical outlets or switch plates, use a small putty knife to pry them loose instead of a chisel to avoid damaging wiring. If you’re working around a sink or stove backsplash, work in small sections to avoid accidentally hitting fixtures with your tools.
 Prying along grout lines with a wood shim buffer protects the underlying drywall from gouges.
Credit: www.designcafe.com
Prying along grout lines with a wood shim buffer protects the underlying drywall from gouges.
Credit: www.designcafe.com
Remove Stubborn, Stuck Tiles
Older tiles or those installed with waterproof thin-set mortar may require extra effort to remove. These techniques will loosen even the most stubborn adhesive without damaging your wall.
Heat to Soften Adhesive
Heat works best on tiles installed with glue-based adhesive, common in kitchens built before 2010. Use a heat gun or hair dryer on high heat to warm the tile surface for 2-3 minutes, moving the heat source constantly to avoid warping the tile or burning the wall. After heating, try prying the tile loose with a putty knife. For extra penetration, score the tile surface in a crosshatch pattern with a utility knife before heating to help the adhesive break down faster.
Chemical Adhesive Removers
For tiles stuck with thin-set mortar or epoxy adhesive, a water-based adhesive remover is the safest option for drywall substrates, as solvent-based removers can dissolve drywall paper and cause surface damage. Apply the remover to the tile and grout lines with a brush, let it sit for the time listed on the product label (usually 15-30 minutes), then pry the tile loose. Always work in a well-ventilated area and wear gloves when using chemical removers.
Heavy-Duty Removal for Thinset
For thick, old thin-set mortar that doesn’t respond to heat or chemical removers, use a rotary hammer with a chisel bit to break up the adhesive. Work in small sections, holding the chisel at a low angle to avoid gouging the wall underneath. This method is best for cement board substrates, which can handle more aggressive prying than drywall or plaster.
Clean and Inspect the Underlying Wall
Once all tiles are removed, your wall will likely be covered in residual adhesive, dust, and possibly small damage. Proper prep at this stage ensures your new tile, paint, or wallcovering adheres properly and lasts for years.
Scrape Off Residual Adhesive
Use a putty knife or plastic scraper to remove as much leftover adhesive as possible from the wall. For stubborn spots, apply a warm mixture of dish soap and water, let it sit for 5 minutes, then scrape again. Avoid using metal scrapers on drywall, as they can easily gouge the surface.
Inspect for Moisture or Mold
Check the entire exposed wall for signs of water damage, soft spots, or mold growth, especially if the removed tiles were installed behind a sink or dishwasher. If you find mold, treat it with a mold-killing solution and let the wall dry completely before moving on to repairs. For significant water damage, you may need to replace sections of drywall before proceeding.
Repair Minor Damage
Small holes, cracks, or gouges in drywall or plaster can be patched with joint compound or spackle. Apply the compound with a putty knife, smooth it with sandpaper once dry, and apply a second coat if needed for a flush finish.
Sand and Smooth the Surface
Once all adhesive and patching is complete, sand the entire wall surface to create a smooth, even base for your new finish. Use 120-grit sandpaper for drywall and 220-grit for plaster to avoid gouging. Wear a dust mask while sanding, then wipe the wall down with a damp cloth to remove all dust particles. If you’re planning to paint or install new tile, apply a coat of primer designed for your chosen finish to improve adhesion.
Choose Your Next Wall Finish
Once your wall is smooth and clean, you can select a paint shade that pairs seamlessly with brown cabinets to create a warm, cohesive look for your updated kitchen. For cooler cabinet tones, a soft neutral or muted shade will brighten the space without clashing.
 Proper chisel angle and light tapping prevent tile shattering and wall damage.
Credit: www.youtube.com
Proper chisel angle and light tapping prevent tile shattering and wall damage.
Credit: www.youtube.com
Dispose of Tiles and Debris Responsibly
Proper disposal keeps your workspace safe and reduces your environmental impact. Many homeowners overlook recycling options for old tiles, but there are several eco-friendly choices available in 2026.
Sort Reusable vs Waste Materials
Separate whole, undamaged tiles from broken pieces and dust. Intact ceramic or porcelain tiles can be donated to local Habitat for Humanity ReStores, community art projects, or reuse centers, where they’ll be given a second life instead of ending up in a landfill.
Local Disposal and Recycling Options
Check with your local waste management facility to confirm rules for construction debris disposal: many areas accept small amounts of broken tile in regular trash, while larger quantities require drop-off at a construction waste recycling center. In 2026, most major tile retailers offer free take-back programs for old tiles when you purchase new ones from their store, so ask about this option before you start your removal project.
Repurposing Unwanted Tiles
Broken tile pieces make excellent garden edging, drainage for potted plants, or mosaic art supplies. If you have a creative streak, repurposing old tiles is a zero-waste way to add a personal touch to your home or garden.
Common Mistakes to Avoid
Even experienced DIYers run into these avoidable pitfalls during tile removal. Following these guidelines will help you skip costly repairs and finish the job faster.
Skipping Grout Removal
Rushing to pry tiles before scoring grout lines leads to chipped tile edges and gouged wall surfaces, as the grout acts as an anchor holding the tile firmly in place. Spending 20 minutes removing grout first will cut your prying time in half and reduce damage risk.
Using Excessive Force
Hammering too hard or prying with a full-sized pry bar will crack drywall, plaster, or cement board, requiring hours of patching and mudding before you can apply your new finish. Always use light, controlled taps and a wood shim buffer between your tool and the wall.
Neglecting PPE
Inhaling silica dust from tile cutting can cause silicosis, a permanent and debilitating lung disease. Even for small removal jobs, an N95 mask and eye protection are non-negotiable, per OSHA guidelines. Cuts from sharp tile shards are also common, so never skip cut-resistant gloves.
Rushing the Process
Working quickly to finish the job in one day often leads to mistakes and wall damage. Work in small sections, check your progress frequently, and take breaks if you start to feel fatigued. A slow, careful approach will always get you better results than rushing.
Frequently Asked Questions
How do I safely remove kitchen wall tiles?
Start by wearing an N95 mask, safety glasses, and cut-resistant gloves. Score grout lines 2-3mm deep with a carbide-tip grout saw, then use a hammer and chisel to tap tiles loose starting at the bottom row. Work slowly to avoid damaging the underlying wall, and clean debris as you go to prevent slip hazards.
What tools are needed to remove kitchen wall tiles?
Essential tools include a carbide-tip grout removal tool, 16-ounce hammer, cold chisel, oscillating multi-tool with a scraper blade, pry bar, and wood shims to protect the wall. For power tool users, a rotary hammer with a chisel bit speeds up removal of thick thin-set adhesive on large areas.
Can I remove kitchen tiles without damaging walls?
Yes, as long as you remove grout first, use gentle prying motions, and place wood shims between your prying tool and the wall to distribute pressure. If you do accidentally damage small sections of drywall, you can patch them with joint compound before applying your new finish.
How long does it take to remove kitchen wall tiles?
For a standard 10×10 foot kitchen backsplash, expect 3-5 hours for removal, plus 1-2 hours for cleanup and wall prep. Larger areas, epoxy grout, or thick thin-set adhesive can add 2-3 hours to the timeline.
Do I need to remove the cement board behind tiles?
No, if the cement board is intact, dry, and free of damage, you can leave it in place and apply new tile, paint, or wallcovering directly. Just scrape off all excess adhesive and sand any rough spots before moving to your next renovation step.
Conclusion
Removing kitchen wall tiles is a manageable DIY project that saves you hundreds in professional labor costs, as long as you prioritize prep, safety, and patience. By assessing your wall first, using the right tools, and working slowly to avoid damage, you’ll have a smooth, repair-ready surface in an afternoon. Once your wall is prepped, you’re ready to move on to the next phase of your kitchen refresh: whether you’re installing new tile, painting, or updating your cabinet hardware, we have guides to streamline every step. If you’re planning a full kitchen update after tile removal, check out our tips for matching wall colors to green cabinetry to ensure a polished, cohesive final result.