How to Hang Plates on Kitchen Wall: Easy Steps for Stunning Decor
Adding a collection of vintage china, hand-painted ceramic plates, or thrifted decorative pieces to your kitchen wall is one of the easiest, most budget-friendly ways to inject personality into the space—no major renovations required. For renters and homeowners alike, a well-executed plate display feels custom and curated, turning a blank wall into a warm, inviting focal point. The catch? Many people avoid hanging plates out of fear of cracked heirlooms, unsightly wall holes, or crooked, unbalanced layouts. This guide walks you through every step, from selecting the right plates for your kitchen’s style to choosing a hanging method that works for your wall type and skill level, so you can create a stunning, secure display that lasts for years.
1. Choose the Right Plates for Your Kitchen Style
The plates you select will set the tone for your entire display, so start by aligning your choices with your kitchen’s existing aesthetic to avoid a disjointed look. For more on this, see our guide on how to regrout kitchen wall tiles easy steps.
Match Plates to Your Kitchen’s Existing Decor
Your cabinet finish, wall color, and backsplash will inform which plates feel intentional rather than out of place. For example, if your kitchen features deep forest green cabinetry, opt for plates with warm cream, mustard, or terracotta accents to create a cozy, cohesive look—you can find more tailored guidance for coordinating wall colors for green cabinetry to tie the whole space together. For kitchens with warm medium-tone wood cabinets, muted earth-toned plates and soft neutral backdrops will make your display feel intentional; check out our tips for wall colors for brown cabinetry to find the perfect shade to make your plates pop.
Prioritize Durability and Weight for Long-Term Display
Not all decorative plates are built for wall hanging. Glazed ceramic and porcelain plates are the most durable, with most standard dinner plates weighing 1–3 lbs, while large serving platters can weigh 5+ lbs. Avoid thin, low-fire clay plates or plates with raised decorative elements on the back, as these are prone to cracking under their own weight over time. A common mistake DIYers make is assuming all decorative plates are wall-safe; if you’re unsure of a plate’s weight, weigh it on a kitchen scale first before selecting hardware. For more on this, see our guide on how to hang kitchen cabinets on wall.
Plan for Size and Quantity Balance
The scale of your plates relative to your wall space will make or break the display. For a standard 3-foot wide wall space, stick to 1 large focal plate (10–12 inches in diameter) paired with 2–3 smaller accent plates (4–8 inches) to avoid overcrowding. Odd-numbered groupings (3, 5, or 7 plates) feel more dynamic and natural than even-numbered arrangements, which can look stiff. If you have a very large blank wall, you can scale up to a 7–9 plate gallery, but leave 2–4 inches of space between each plate to keep the layout from feeling cluttered.
 A padded plate hanger grips the rim of a ceramic plate without scratching its glaze, ready for wall mounting.
Credit: enthrallinggumption.com
A padded plate hanger grips the rim of a ceramic plate without scratching its glaze, ready for wall mounting.
Credit: enthrallinggumption.com
2. Prep Your Wall for Secure, Damage-Free Hanging
Skipping wall prep is the top cause of fallen plates and damaged walls, so spend 10–15 minutes on this step to avoid costly repairs later.
Identify Your Wall Type First
Different wall surfaces require completely different hardware, so test your wall before buying supplies. Tap the wall: a hollow sound indicates drywall, while a solid thud means plaster, brick, or concrete. Use a stud finder if you’re hanging plates over 5 lbs, as mounting into a wall stud provides far more support than drywall alone. For renters who can’t make permanent holes, note that all the hanging methods below have no-drill options that won’t damage security deposits.
Clean and Mark Your Mounting Points
Kitchen walls accumulate grease, dust, and cooking residue that can weaken adhesive or cause hooks to slip. Wipe the entire hanging area with a trisodium phosphate (TSP) cleaner or mild dish soap and water, then let it dry fully for at least 1 hour before proceeding. Once dry, use a laser level to draw a faint horizontal line at your desired hanging height, then mark the exact mounting points for each hook or anchor with a small piece of painter’s tape (this avoids permanent pencil marks on your walls). Double-check all measurements with a tape measure before moving to the next step.
Gather the Right Hardware for Your Setup
The hardware you choose will depend on your plate weight, wall type, and whether you want to avoid holes entirely. Stock your toolkit with:
- Adhesive hooks or strips rated for your plate weight (best for no-drill setups)
- Plate hangers (clip-on or wire-style, sized to match your plate diameter)
- Wall anchors (plastic for drywall, masonry for brick/plaster)
- A drill, hammer, screwdriver, and level for permanent mounting
- Painter’s tape for template testing
If your target hanging spot is adjacent to a wall-mounted kitchen faucet, remove the fixture first to avoid chipping its finish during installation using our guide to removing wall-mounted faucets.
3. 3 Proven Hanging Methods for Every Skill Level
Choose the method below that matches your plate weight, wall type, and willingness to make minor modifications to your plates or walls.
| Method | Best For | Weight Limit | Pros | Cons |
|---|---|---|---|---|
| No-drill adhesive hooks | Renters, lightweight plates, smooth painted drywall | 2–5 lbs per hook | No wall damage, easy to remove, no tools required | May leave residue on textured paint, not suitable for heavy plates |
| Clip-on plate hangers | Standard ceramic plates, most wall types | Up to 8 lbs per hanger | No modification to plate backs, easy to swap plates | Small metal hanger is visible on the plate rim |
| Wire and D-ring hanging | Heavy or antique plates, plaster/brick walls | 10+ lbs | Most secure, distributes weight evenly, nearly invisible from the front | Requires attaching small D-rings to the plate back |
| Decorative display rails | Renters who swap plates seasonally | 3–6 lbs per rail | No wall damage, easy to rearrange plates | Less secure for very heavy or top-heavy plates |
No-Drill Adhesive Hooks
This is the best option for renters or anyone who wants to avoid wall holes entirely. Choose hooks rated for at least 2 lbs more than your plate’s total weight (e.g., use a 5 lb hook for a 3 lb plate) to account for gravity and movement. Clean the wall surface with rubbing alcohol, press the hook firmly against the wall for 30 seconds, then wait 1 full hour before hanging the plate to let the adhesive fully cure. For extra security, use two hooks per plate spaced 2–3 inches apart to distribute weight.
Clip-On Plate Hangers
The most popular option for standard decorative plates, clip-on hangers grip the plate’s rim without damaging its glaze. Select a hanger sized to match your plate’s diameter (most hangers fit 6–12 inch plates) and opt for padded plastic or rubber-lined metal hangers to avoid scratching delicate vintage plates. For drywall, use a small nail or screw to mount the hanger’s hanging loop to the wall; for plaster, use a masonry screw for a more secure hold. This method is ideal if you want to swap plates out seasonally, as the hanger can be left on the plate when it’s not on display.
Wire and D-Ring Hanging
The most secure option for heavy stoneware, antique plates, or displays on brick or plaster walls. Start by attaching two small D-rings to the back of the plate, spaced 1/3 of the way down from the top edge, using small screws designed for ceramic. Run galvanized picture wire between the two D-rings, pulling it taut but not so tight that it pulls the D-rings out of the plate. Hang the wire on a heavy-duty wall hook or screw mounted into a stud or anchor. This method distributes the plate’s weight evenly, reducing the risk of the plate cracking under pressure.
For official guidance on safe wall mounting practices to avoid damage or tip-over hazards, refer to the University of Minnesota Extension’s safe wall mounting best practices guide.
 Tracing plate outlines on paper lets you test your layout without making permanent wall marks.
Credit: enthrallinggumption.com
Tracing plate outlines on paper lets you test your layout without making permanent wall marks.
Credit: enthrallinggumption.com
4. Design a Stunning, Balanced Plate Display
A well-designed layout will make even inexpensive plates look high-end, while a poorly planned arrangement can feel cluttered and haphazard.
Pick a Layout That Fits Your Wall Shape
The shape of your blank wall will dictate which layout works best:
- Rectangular walls (e.g., above a kitchen counter): Stick to a single horizontal row of 3–5 plates in graduating sizes, with the largest plate in the center.
- Tall narrow walls (e.g., next to a refrigerator): Use a vertical stack of 3–4 plates, spaced evenly from floor to eye level.
- Square walls: Create a clustered gallery layout with plates of varying sizes and heights for an eclectic, curated feel.
Use Templates to Avoid Costly Mistakes
Never hang plates without testing the layout first. Trace the outline of each plate onto paper, cut out the shapes, and tape them to the wall with painter’s tape. Step back and assess the arrangement from across the room: if it feels unbalanced, adjust the placement of the templates until you’re happy with the look. Once you’ve finalized the layout, mark the exact hanging points for each hook or anchor through the paper templates with a pencil. This simple step eliminates crooked plates and unnecessary wall holes.
Balance Color, Pattern, and Negative Space
To avoid a cluttered, chaotic display, stick to a 60-30-10 color rule: 60% of your plates should be neutral (white, cream, gray), 30% should be accent colors that match your kitchen’s decor (e.g., the same blue as your backsplash), and 10% can be bold, patterned statement pieces. If you’re mixing patterns, stick to one style (e.g., all floral, all geometric) to keep the look cohesive. Leave 2–4 inches of empty space between each plate to let the display breathe—overcrowding is the most common design mistake DIYers make.
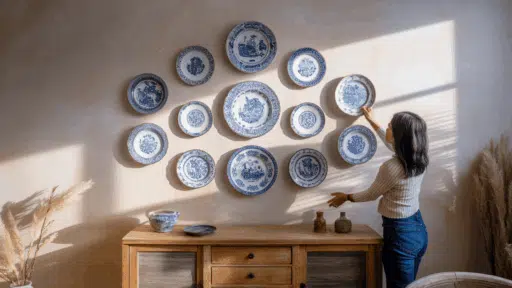
 A clustered gallery of vintage ceramic plates adds warmth to a neutral kitchen wall.
Credit: enthrallinggumption.com
A clustered gallery of vintage ceramic plates adds warmth to a neutral kitchen wall.
Credit: enthrallinggumption.com
5. Long-Term Safety and Maintenance
A properly hung plate display can last for years with minimal upkeep, but a few simple steps will keep it looking its best and prevent accidents.
Test Stability After Hanging
Once all plates are hung, gently nudge each one to check for wobble. If a plate moves, tighten the hardware or add extra adhesive to the hook. Wait 24 hours before touching the plates again if you used adhesive, as the full cure time is required for maximum hold. For heavy displays, test the hold by gently pressing on the wall next to the hooks to make sure they don’t pull out.
Clean Plates and Hardware Regularly
Kitchen grease and dust will build up on plates and hanging hardware over time, dulling their finish. Wipe plates gently with a damp microfiber cloth monthly; avoid harsh abrasive cleaners that can scratch glazed or painted finishes. Check adhesive hooks every 6 months for signs of peeling or loosening, and replace them if the adhesive is no longer sticking to the wall. For wire and D-ring hangers, tighten the wire occasionally if it starts to sag under the plate’s weight.
Adjust for Seasonal Changes
If you swap plates out for holidays or seasonal decor, take down old plates before hanging new ones to avoid overloading a single hook or anchor. Store removed plates in a padded box to prevent chipping while they’re not on display.
Frequently Asked Questions
How do I prepare plates for wall hanging?
Start by wiping each plate with a mild soap and water solution to remove dust, grease, or manufacturing residue, then dry it fully with a soft microfiber cloth. Avoid abrasive cleaners that can scratch glazed finishes. For adhesive hanging methods, make sure the back of the plate is completely smooth—no raised decorative elements or rough spots that could prevent the adhesive from sticking. For wire or D-ring hanging, attach the hardware to the plate back first, following the manufacturer’s weight limits, before moving to wall mounting.
What tools do I need to hang plates on walls?
For basic hanging, you’ll need a measuring tape, pencil, level, and the appropriate hardware for your chosen method. For adhesive hanging, no tools beyond a cleaning cloth are required. For nail or screw-in hangers, you’ll need a hammer or drill, plus wall anchors rated for your plate weight and wall type. A laser level is a helpful optional tool for ensuring perfect alignment across multiple plates, especially for large gallery displays.
Can I hang heavy plates without damaging walls?
Yes, as long as you use hardware rated for the plate’s weight and your wall type. For plates over 5 lbs on drywall, use toggle bolts or molly anchors that spread the weight across a larger area of the wall, rather than standard nails that can pull out or crack the drywall. For plaster or brick walls, use masonry screws and a properly sized masonry bit to drill pilot holes, which prevents cracking the wall surface. Always test the hardware’s hold by gently tugging on it before hanging the plate.
How do I arrange plates aesthetically on a kitchen wall?
Start by arranging your plates on the floor to test different layouts, then transfer your favorite arrangement to the wall using paper templates. Stick to odd-numbered groupings (3, 5, or 7 plates) for a more dynamic, natural look, and leave 2–4 inches of space between each plate to avoid crowding. Align the top or center of each plate at the same height for a clean, balanced look, or stagger heights for a more eclectic gallery feel.
Can I hang plates above a stove or kitchen sink?
It’s best to avoid hanging plates directly above heat sources like stoves, ovens, or toaster ovens, as prolonged exposure to heat can crack glazed finishes or discolor painted plates. Similarly, avoid hanging plates above a sink or dishwasher splash zone, as moisture and grease buildup will be harder to clean off the plates and hardware over time. Opt for a spot at least 2 feet away from these areas for the longest-lasting display.
Conclusion
Hanging plates on your kitchen wall is a low-effort, high-reward decor project that works for every skill level, budget, and living situation—whether you’re a homeowner looking to personalize your space or a renter who can’t make permanent modifications. A well-curated display adds warmth, tells a story, and makes your kitchen feel uniquely yours, all without costing a fortune. Once your plates are up, tie the whole look together by choosing a wall color that complements both your plates and your kitchen’s cabinetry—our guides to coordinating wall colors for green and brown kitchen cabinets make it easy to find the perfect shade for your space. Happy decorating!