How to Open a Kitchen Wall: Expert Tips for a Stunning Remodel
Tearing down a kitchen wall to open up your space is one of the most transformative remodels you can tackle—but it’s also one of the riskiest if you skip critical prep steps. Whether you’re removing a small half-wall to create a breakfast bar or taking out a full load-bearing wall to merge your kitchen with your dining or living room, small oversights can lead to costly structural damage, code violations, or even safety hazards. This 2026-updated guide walks you through every step of the process, from pre-removal assessment to final styling, with expert tips to help you avoid the most common DIY pitfalls and end up with a stunning, code-compliant open kitchen.
Pre-Removal Assessment: The Non-Negotiable First Step
Before you pick up a single tool, you need to confirm exactly what you’re working with. Skipping this step is the leading cause of failed kitchen wall projects, as misidentifying structural supports or hidden utilities can lead to thousands of dollars in repairs.
Identify Load-Bearing Walls
Determining if your wall supports your home’s structure is your top priority. Load-bearing walls hold up floors, roofs, or upper-level framing, so removing them without proper support can cause catastrophic structural failure. Start by pulling your home’s blueprints from your county’s online building portal (most jurisdictions offer free or low-cost access to these records as of 2026). Walls that run perpendicular to floor joists, align with a central roof support, or have a double top plate are almost always load-bearing. A common mistake DIYers make is assuming interior walls between common areas are non-structural, when in fact many align with central home framing. When in doubt, consult a licensed structural engineer—this $300–$700 investment can save you from $10,000+ in repair costs later.
Locate Hidden Utilities
Walls often hide plumbing pipes, electrical wires, or HVAC ducts that keep your home functioning. Cutting into a wall without checking can lead to water leaks, power outages, or costly repairs. Use a non-contact voltage tester to scan for live wires, and a moisture meter to check for hidden plumbing, before making any cuts. If you’re unsure, remove a 1×1 inch section of drywall at the top of the wall to inspect the cavity. Always shut off your home’s main water and power supply before opening the wall, and test that utilities are fully offline before proceeding.
Secure Required Permits
Nearly all U.S. jurisdictions require permits for wall removal to ensure work complies with local safety codes. 2026 building codes in most areas also require a licensed professional sign-off on load-bearing wall work, even for fully DIY projects. Reach out to your local building department to confirm required paperwork, which typically includes a site plan, structural calculations for any new support beams, and proof of contractor licensing if you’re hiring help. Skipping permits can lead to fines, forced restoration of the wall, or issues when selling your home down the line.
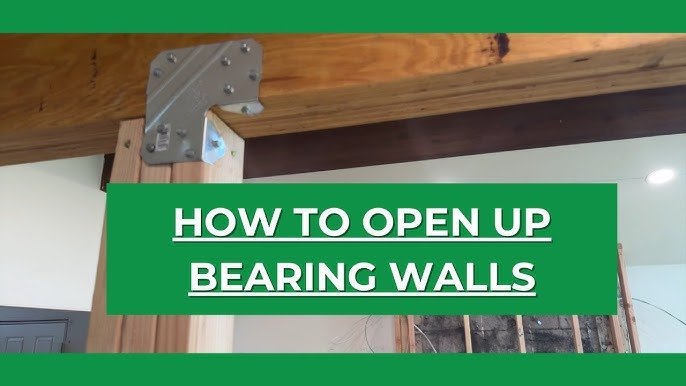
 Temporary support posts are required before cutting any load-bearing wall studs to prevent structural collapse.
Credit: greengroupremodeling.com
Temporary support posts are required before cutting any load-bearing wall studs to prevent structural collapse.
Credit: greengroupremodeling.com
Planning Your Open Kitchen Layout
A clear plan eliminates costly mid-project changes and ensures your new space functions as well as it looks. Spend time mapping out your design, budget, and material choices before demolition begins.
Design for Function and Flow
Start by sketching your desired layout: full wall removal for a fully open concept, a half-wall removal for a partial divide, or a full removal with a beam and island for a defined kitchen zone. Match the design to your home’s style: exposed wood beams work well for Craftsman or farmhouse homes, while flush steel LVL beams fit modern or industrial aesthetics. When selecting paint colors for the new opening, coordinate hues with your existing cabinetry for a cohesive look—our guides to paint color pairings for green kitchen cabinets and coordinating wall finishes with brown cabinetry offer tailored recommendations for every style.
Budgeting for Hidden Costs
Set a realistic budget that accounts for more than just materials. 2026 average costs include:
- Permit fees: $200–$800, depending on your location
- Structural engineer consultation: $300–$700 for load-bearing walls
- Temporary support rental: $100–$300 for weekend use
- Contingency fund: 15–20% of your total budget for unexpected utility reroutes or code adjustments Get quotes from at least 3 licensed contractors if you’re hiring help, and track expenses weekly to avoid overspending.
Material Selection for Durability and Style
Pick materials that meet local building codes and match your kitchen’s existing aesthetic. For structural support, laminated veneer lumber (LVL) is the most common 2026 choice for residential spans, as it is stronger and more warp-resistant than solid wood. For finishes, use 5/8 inch Type X fire-rated drywall for walls adjacent to the kitchen (required by most 2026 residential codes), and select flooring materials that match your existing space for a seamless transition.
Pre-Work Preparation: Protecting Your Home and Team
Proper prep minimizes damage to your existing space and keeps you safe during demolition. Follow these steps before you start tearing down drywall.
Clear and Protect Belongings
Remove all items from a 6-foot radius of the work wall, including small appliances, dishes, and decor. Cover remaining furniture and appliances with heavy-duty moving blankets, not just thin plastic sheeting, to block dust. Use 6-mil polyethylene sheeting for floors, secured with painter’s tape, and temporary zip-wall barriers to contain dust to the kitchen only—this prevents fine drywall dust from spreading to living areas, a common oversight that leads to days of extra cleaning.
Safety Gear and Site Prep
Wear a P100 respirator (not a basic dust mask, which does not filter fine drywall particles), cut-resistant gloves, steel-toe boots, and safety glasses at all times. Keep a first aid kit and fire extinguisher within arm’s reach, and set up a designated tool station to avoid tripping hazards. If you’re working in a multi-story home, wear a hard hat to protect against falling debris.
Utility Shutoffs and Testing
If the wall runs adjacent to your kitchen sink, you may need to remove a wall-mounted kitchen faucet first to avoid damaging fixtures during demolition. Shut off your home’s main water and power supply, lock out your electrical panel to avoid accidental activation, and test for live wires with a non-contact voltage tester even after shutting off power, as circuits are often mislabeled in older homes.
Safe Wall Removal: Step-by-Step Demolition
Demolition is the fastest part of the project if you follow a structured process to avoid damaging adjacent walls, floors, or fixtures.
Demolition for Non-Load-Bearing Walls
- Score the drywall along all seams with a utility knife to minimize dust and large chunks of debris.
- Use a pry bar to pull drywall sheets off in large sections, rather than smashing them into small pieces.
- Cut wall studs with a reciprocating saw 1 inch above the bottom plate and 1 inch below the top plate to avoid damaging adjacent walls.
- Remove the bottom plate with a pry bar, being careful not to gouge the subfloor. For small openings under 4 feet wide, you can patch the gap with a header made of doubled 2×8 studs, a budget-friendly DIY option approved by most 2026 residential building codes for small spans.
Load-Bearing Wall Removal and Temporary Support
Never cut into a load-bearing wall without temporary support in place. Rent adjustable steel support posts from a home improvement store, and place them every 4 feet along the wall, directly under existing floor or roof joists, before removing any studs. Follow OSHA’s construction demolition safety standards to minimize injury risk during the teardown process, including requirements for respiratory protection and fall prevention for multi-story homes. Once the wall is removed, keep temporary supports in place until the permanent beam is fully installed and secured.
Debris Disposal Best Practices
2026 municipal waste rules in most areas require separate disposal of drywall, wood, and metal construction debris. Many cities offer curbside pickup for drywall (which can be recycled into new drywall product) for a small fee, while scrap metal from old studs or pipes can be dropped off at local recycling centers for free or a small rebate. Never mix construction waste with regular household trash, as this can lead to fines.
Structural Support Installation: Keeping Your Home Safe
If you’re removing a load-bearing wall, proper permanent support is non-negotiable for safety and code compliance. All structural changes must comply with the International Residential Code (IRC) standards set by the International Code Council, which are adopted in some form by every U.S. state to ensure residential safety and consistency.
Choosing the Right Beam for Your Span
As of 2026, most local building codes require beams to be sized to handle both dead loads (the weight of the roof and floors) and live loads (snow, furniture, and foot traffic), so never rely on generic online sizing charts—always use calculations from your licensed structural engineer. For most residential open kitchen spans:
- 10–12 feet: Double 2×10 LVL
- 13–18 feet: Double 2×12 LVL
- Spans over 18 feet: Steel I-beam or engineered glulam beam You can fire-treat the beam if required by local code, which adds 10–15% to material cost, or leave it exposed as a design feature.
Installing and Securing the Beam
Once your temporary supports are level, cut the wall opening 1/2 inch larger than the beam on all sides to allow for shimming. Slide the beam into place, and use pressure-treated wood shims every 2 feet to ensure it is perfectly level. Secure the beam to the existing framing with structural screws (not regular drywall screws, which are not rated for load-bearing use). If you want an exposed beam finish, sand and stain it before installation, or opt for a pre-finished steel beam for a low-maintenance industrial look.
Post and Column Placement for Large Openings
If your span is over 18 feet, you will need vertical posts or columns every 8–10 feet to transfer the load to your home’s foundation. These supports can be hidden inside a kitchen island or pantry, or styled as exposed steel or wood columns to match your design. A common mistake is placing posts too far apart, which leads to beam sag over time—always follow your structural engineer’s placement guidelines.
Finishing the Opening: Seamless Transitions
The final finishing steps ensure your new opening looks polished and matches the rest of your kitchen, while meeting all 2026 safety codes.
Drywall, Taping, and Painting
Cover exposed studs with 5/8 inch Type X fire-rated drywall (required for walls adjacent to kitchen spaces in most 2026 codes). Tape seams with paper tape and apply 3 thin coats of joint compound, sanding with 120-grit sandpaper between each coat for a smooth finish. Prime with a stain-blocking primer before painting to avoid tannin bleed from any exposed wood framing, then paint to match your existing wall color, blending edges seamlessly to avoid visible patch lines.
Flooring Matching and Transition
Check the flooring around the new opening for consistency. For hardwood floors, sand and stain new planks to match your existing flooring for a seamless look. If you’re using a different material (like tile next to hardwood), install a T-molding transition strip for a clean, professional edge. Fill any gaps with matching grout or filler, and clean the area thoroughly to remove dust before finishing.
Electrical, Plumbing, and Lighting Updates
Reroute any wires or pipes that were in the removed wall, and update all outlets within 6 feet of the kitchen sink to GFCI (ground-fault circuit interrupter) outlets, a requirement of the 2026 National Electrical Code (NEC) for all kitchen spaces. Add recessed lights or pendant fixtures above the new opening to define the space and improve task lighting, and consider installing dimmers to adjust brightness for different times of day.
Maximizing Your New Open Kitchen Space
A removed wall creates far more than just an opening—it’s an opportunity to add functionality, storage, and style to your kitchen. Use these expert tips to make the most of your new space:
Functional Additions
Add a kitchen island with built-in storage to compensate for lost cabinet space from the removed wall, or install a raised half-wall with a counter overhang for a casual breakfast bar that still blocks kitchen noise from adjacent living areas. If you don’t want a fully open layout, a half-wall with a glass panel maintains light flow while creating a visual divide between the kitchen and other living spaces.
Styling for Cohesion
Frame the new opening with matching trim and molding to tie it to the rest of your home’s architecture. Add a large pendant light or chandelier over any seating area to create a focal point, and use an area rug to define the kitchen zone without building additional walls. For small spaces, open floating shelves in the new opening add storage for cookbooks and decor without closing off the area.
 Open shelving in a new wall opening adds storage and personality without closing off the space.
Credit: inmyownstyle.com
Open shelving in a new wall opening adds storage and personality without closing off the space.
Credit: inmyownstyle.com
Frequently Asked Questions
How much does it cost to open a kitchen wall in 2026?
Costs vary widely based on wall type and scope. A DIY non-load-bearing 8-foot wall removal runs $300–$800 for materials and permits, while professional load-bearing wall removal with beam installation averages $3,000–$12,000 depending on your region and span length. Always add a 15–20% contingency for unexpected utility reroutes or code compliance adjustments.
How do I know if my kitchen wall is load-bearing?
Start by checking your home’s blueprints (available from your county’s building department portal for a small fee in most areas). Walls that run perpendicular to floor joists, align with a central roof support, or have a double top plate are almost always load-bearing. When in doubt, consult a licensed structural engineer—cutting a load-bearing wall without proper support can cause catastrophic structural failure.
Do I need a permit to remove a kitchen wall?
In nearly all U.S. jurisdictions, permits are required for any wall removal that impacts structural integrity, electrical, plumbing, or HVAC systems. 2026 building codes in most areas also require a licensed professional sign-off on load-bearing wall work, even for DIY projects. Skipping permits can lead to fines, forced restoration of the wall, or issues when selling your home down the line.
Can I remove a load-bearing wall myself?
While you can handle demolition of a load-bearing wall under the supervision of a licensed contractor, beam installation and permanent structural support should always be completed by a professional. Improperly installed beams can lead to roof sag, floor instability, or even collapse, making this a high-risk task for inexperienced DIYers.
What’s the most common mistake people make when opening a kitchen wall?
The most frequent error is failing to locate hidden utilities before cutting into the wall, leading to water leaks, electrical shock, or costly repairs. A close second is skipping temporary support for load-bearing walls during demolition, which can cause immediate structural damage.
Conclusion
Opening a kitchen wall is a high-impact remodel that can transform your home’s flow, natural light, and resale value—but only if you prioritize safety, code compliance, and thoughtful planning at every step. Start by confirming your wall’s structural status, secure required permits, and invest in proper temporary and permanent support for load-bearing walls to avoid costly, dangerous mistakes. Whether you’re tackling a small half-wall removal yourself or hiring a pro for a full structural opening, taking the time to plan your layout, match finishes to your existing kitchen, and account for hidden utility costs will ensure you end up with a stunning, functional space that lasts for years. Ready to start your project? Reach out to a local licensed structural engineer this week to confirm load requirements and get an accurate estimate for your specific space.
 Credit: www.reddit.com Once your open kitchen is complete, it becomes the natural hub of your home for everything from casual family meals to hosted dinner parties. If you’re planning to use the space for entertaining, our guide to pairing pasta and wine for memorable gatherings offers curated tips for setting the perfect mood, while our roundup of durable hosting supplies features low-maintenance, spill-proof options ideal for high-traffic kitchen zones. For compact open layouts, maximizing vertical storage without closing off the space is key—our guide to space-efficient home hobby kits includes clever shelving layouts that fit even tight kitchen openings while keeping everyday items within reach.
If you’re ready to move forward with your wall removal project, the first step is booking a free consultation with a local licensed structural engineer this week to confirm load requirements and lock in an accurate, no-obligation estimate for your specific space.