How to Build a Pony Wall for Kitchen Island: Easy Step-by-Step Guide
A pony wall (also called a half wall or knee wall) is a short, typically non-load-bearing partition that runs perpendicular to your kitchen island base to define the space without blocking sightlines, light, or traffic flow. For open-concept kitchens, it creates a clear boundary between cooking and dining areas, adds extra seating, provides space for open shelving or cabinet storage, and can boost your home’s resale value by adding functional, custom square footage that home buyers often prioritize. Unlike a full wall, it’s a beginner-friendly DIY project that requires no advanced carpentry skills, can be completed in 2–3 days for most DIYers, and costs a fraction of hiring a contractor for the same build. This guide covers pre-build planning, framing, finishing, countertop installation, common pitfalls, and pro tips for a professional, long-lasting result.
Pre-Build Planning: The 5 Non-Negotiable Steps to Avoid Costly Mistakes
Skipping planning is the most common cause of failed DIY pony wall builds. Taking 1–2 hours to work through these steps will save you hours of rework and hundreds of dollars in wasted materials later.
1. Confirm Local Permit Requirements
If you plan to add electrical outlets, under-island lighting, or plumbing for a sink, most jurisdictions require a permit for the work. Even non-structural pony walls may need a permit if they modify existing walls or utility lines. Contact your local building department before purchasing materials; permit fees typically range from $100 to $500 depending on your location, but they ensure your build meets safety codes and avoid costly fines or rework later. If you’re only building a simple, non-load-bearing pony wall with no utility modifications, a permit is often not required, but always verify with local officials first.
2. Pick the Perfect Location
Leave at least 36 inches of clearance between the pony wall and adjacent cabinets, appliances, or walkways for safe movement. If you plan to add bar stools for seating, leave 24 inches of space per stool for comfortable legroom. Check for existing utilities in the planned footprint: use a stud finder with voltage detection to locate electrical lines, and check for plumbing or radiant floor heating lines. If you have radiant floor heating, you cannot drive screws directly into the floor, so you’ll need to anchor the pony wall to the adjacent kitchen walls instead, or use concrete anchors if you’re on a slab. Match the pony wall height to your needs: 36 inches matches standard kitchen counter height for casual dining and food prep, while 42 inches is standard bar height for a more formal seating area.
Precise floor marking ensures the pony wall aligns perfectly with your existing island base
Credit: www.contractortalk.com
3. Finalize Your Design and Materials List
Gather all materials and tools before you start cutting to avoid delays mid-build:
- Framing materials: 2×4 pressure-treated lumber (for concrete slab installations to resist moisture) or standard SPF 2x4s (for wood subfloors); 3-inch wood screws for framing, 1.25-inch drywall screws for sheathing, concrete anchors for slab installations.
- Sheathing: 1/2-inch drywall for paint finishes, 1/2-inch cement board if you plan to tile the pony wall.
- Finish materials: Baseboard trim, joint compound, drywall tape, primer, paint or tile, countertop material of your choice, construction adhesive, countertop mounting brackets (for stone/quartz).
- Tools: Circular saw or miter saw, drill/driver, 4-foot level and laser level, tape measure, stud finder, utility knife, drywall saw, sanding block, safety glasses, work gloves, N95 dust mask.
For framing, 16 inches on center (OC) stud spacing is standard for maximum countertop support; 24 inches OC is acceptable for non-load-bearing walls with lightweight countertops like laminate. If you want to add built-in storage, pick up 1×2 furring strips and floating shelf hardware before you start building.
Prepare Your Workspace for a Clean, Safe Build
A tidy, protected workspace prevents accidents, reduces cleanup time, and ensures your build goes smoothly from start to finish.
Clear and Protect Surrounding Areas
Remove all items from the island footprint and 3 feet of clearance around the build area. Take off any existing baseboards or trim that will be covered by the new pony wall. Cover floors with 6-mil drop cloths, secured with painter's tape to prevent slipping. Shield adjacent cabinets, appliances, and flooring with corrugated cardboard or protective plastic sheeting, taped in place to avoid dust and debris damage. If you have open food prep areas nearby, set up a temporary plastic barrier to keep construction dust out of food and cooking surfaces, a step many DIYers skip that leads to extra cleanup later.
Safety Prep
Put on safety glasses and work gloves before cutting any lumber or drywall. Ventilate the area by opening windows or running a fan if you’ll be using joint compound or paint, to avoid inhaling fumes. If you’re working in a home with children or pets, block off the build area entirely to prevent accidents with sharp tools or materials. Always follow OSHA’s DIY home renovation safety guidelines when working with power tools and heavy materials to avoid injury.
Build the Structural Frame: Step-by-Step
The frame is the foundation of your pony wall, so precision here will make finishing far easier and ensure your final build is stable and level.
Step 1: Cut Lumber to Exact Dimensions
Measure the total length of your planned pony wall, then add 1/2 inch to each end to account for the thickness of your drywall or sheathing. Cut two bottom plates (matching your adjusted length) and two top plates (same length) from 2x4s. Cut vertical studs to your desired wall height minus 3 inches: this accounts for the 1.5-inch thickness of both the top and bottom plates, plus 1/2 inch for the baseboard thickness at the bottom. For a 36-inch tall pony wall, cut studs to 33 inches; for a 42-inch bar-height wall, cut studs to 39 inches. Mark stud locations on the bottom and top plates: space them 16 inches OC for standard support, or 24 inches OC for lighter loads.
Step 2: Assemble the Frame on a Flat Surface
Lay the bottom plate on a flat work surface (a sheet of plywood on sawhorses works perfectly). Align the vertical studs vertically between the top and bottom plates, matching your pre-marked locations. Pre-drill pilot holes through the top and bottom plates into the end of each stud to prevent the wood from splitting when you drive screws. Secure each stud with two 3-inch wood screws per connection. Check all corners with a carpenter’s square: every corner should measure exactly 90 degrees. A common mistake here is skipping the square check, which leads to a wavy, uneven wall that won’t align with your island base and will make finishing much harder later. Once assembled, the frame should be rigid with no wobble when you lift it.
 In-progress pony wall framing, showing stud placement before drywall installation
Credit: www.reddit.com
In-progress pony wall framing, showing stud placement before drywall installation
Credit: www.reddit.com
Step 3: Position and Secure the Frame to the Floor
Lift the assembled frame into position on your pre-marked floor layout. Use a 4-foot level to check that the frame is perfectly vertical (plumb) along its entire length, and a tape measure to confirm it’s the correct distance from adjacent walls and cabinets. For wood subfloors: pre-drill pilot holes through the bottom plate into the subfloor every 24 inches, then secure with 3-inch deck screws. For concrete slabs: use a masonry bit to drill 2-inch deep holes, then secure the frame with 3-inch concrete anchors. For added stability, toe-screw the frame into adjacent kitchen walls if the pony wall runs parallel to them. Once secured, wiggle the frame hard to confirm it has no movement; if it shifts, tighten fasteners or add additional anchors as needed. For official framing best practices that ensure structural stability and code compliance, refer to University of Minnesota Extension’s residential wall framing guide, which outlines recommended stud spacing and anchoring requirements for non-load-bearing partitions.
Install Sheathing and Finish the Wall Surface
This step transforms the rough frame into a smooth, even surface ready for paint, tile, or other finishes.
Step 1: Attach Sheathing or Drywall
For a paint finish: cut 1/2-inch drywall to fit the height and length of your frame, using a utility knife to score and snap sheets for clean, straight edges. Attach the drywall to the frame with 1.25-inch drywall screws, spaced 8 inches apart along all edges and 12 inches apart in the center of the sheet. Screw heads should sit just below the paper surface, not tear through it, to avoid bumps in your finished wall. For a tile finish: use 1/2-inch cement board instead of drywall, attach with cement board screws, and tape all seams with alkali-resistant mesh tape before applying thin-set mortar.
Step 2: Tape, Mud, and Sand Seams
Cover all drywall or cement board seams with paper drywall tape (for drywall) or mesh tape (for cement board). Apply a thin first coat of joint compound (mud) with a 6-inch drywall knife, feathering the edges 2 inches beyond the seam on both sides to create a smooth transition. Let the first coat dry completely (24 hours in humid climates, 4–6 hours in dry conditions). Sand the dried compound smooth with 120-grit sandpaper, then apply a second coat with a 10-inch knife, feathering edges 4 inches beyond the first coat. Let dry, sand again. For a perfectly smooth, paint-ready finish, apply a third thin coat if needed, then sand with 220-grit sandpaper. Always wear an N95 dust mask during sanding to avoid inhaling fine drywall particles, a common oversight that causes respiratory irritation.
Step 3: Add Custom Finish Details (if tiling)
If you’re tiling the pony wall, apply thin-set mortar to the cement board with a notched trowel, then press tiles into place, using tile spacers to keep grout lines even. Let the thin-set dry for 24 hours, then apply grout with a rubber float, wiping away excess with a damp sponge. Seal the grout after 72 hours to prevent staining and water damage.
Add Trim, Paint, and Final Finishes
This step transforms the plain, finished wall into a polished feature that matches your kitchen’s existing design.
Install Baseboard and Decorative Trim
Cut baseboard to match the length of your pony wall, mitering corners at 45 degrees for a tight, professional fit. Attach the baseboard with 1.5-inch finishing nails, spaced 12 inches apart, using a nail gun for speed or a hammer for small projects. Fill all nail holes with wood filler, sand smooth once dry. For a custom look, add chair rail trim halfway up the wall, or install shiplap for a farmhouse aesthetic. If you want to add closed cabinet storage, attach cabinet face frames to the pony wall frame before installing drywall, then install cabinet doors once the wall is finished. If you’re refreshing your kitchen’s color scheme alongside this build, coordinating wall colors with your new pony wall will create a cohesive, polished look.
Prime and Paint for a Durable Finish
Apply a stain-blocking primer to the entire surface, especially if you’re covering raw wood or patched drywall, to prevent knots and stains from bleeding through your paint. Let the primer dry per the manufacturer’s instructions (usually 2–4 hours). Use a satin or semi-gloss paint for easy cleaning and moisture resistance, ideal for high-traffic kitchen spaces. Apply two thin coats with a roller for the main surface and a small angled brush for edges and trim, letting each coat dry fully (1–2 hours between coats) to avoid drips and uneven coverage. If you’re matching your existing kitchen wall color, bring a paint chip sample to the hardware store to get a custom mix for a seamless finish. For homeowners with brown cabinetry, cabinet-matched palettes like warm white, taupe, or soft gray work particularly well with natural wood trim on pony walls.
Install the Countertop and Final Hardware
The countertop transforms your pony wall from a partition into a functional kitchen island. This step requires careful measurement and secure fastening to avoid wobbles or damage over time.
Choose the Right Countertop Material for Your Needs
Your countertop choice will impact both the look and durability of your island. Here are the most popular options, with clear trade-offs:
| Material | Cost Per Sq Ft | Pros | Cons |
|---|---|---|---|
| Laminate | $20–$50 | Budget-friendly, scratch-resistant, hundreds of color/pattern options | Can be damaged by hot pans and sharp knives |
| Butcher Block | $30–$100 | Warm natural aesthetic, easy to repair minor scratches with sanding | Requires monthly sealing to prevent water damage and staining |
| Quartz | $60–$150 | Low-maintenance, non-porous, scratch and stain resistant, no sealing needed | Higher upfront cost, limited heat resistance |
| Granite | $40–$100 | Unique natural stone look, heat and scratch resistant | Requires annual sealing, higher cost than laminate |
For busy households that use the island for food prep, homework, or casual dining, quartz or laminate are the most low-fuss options that hold up to daily wear.
Secure the Countertop Safely
First, dry-fit the countertop: set it on top of the finished pony wall, overhanging 1–1.5 inches on the side facing the kitchen for comfortable seating. Use plastic shims under the countertop to level it completely, checking with a level across the entire surface. Once level, apply a continuous bead of construction adhesive to the top edge of the pony wall, then set the countertop in place. For laminate or solid surface countertops, secure from underneath by drilling pilot holes through the pony wall’s top plate into the countertop substrate, then drive 1.5-inch stainless steel screws. For heavy stone or quartz countertops, use manufacturer-recommended mounting brackets to support the weight, and have a helper assist with lifting to avoid injury or damage. Wipe away any excess adhesive immediately with a damp cloth before it dries.
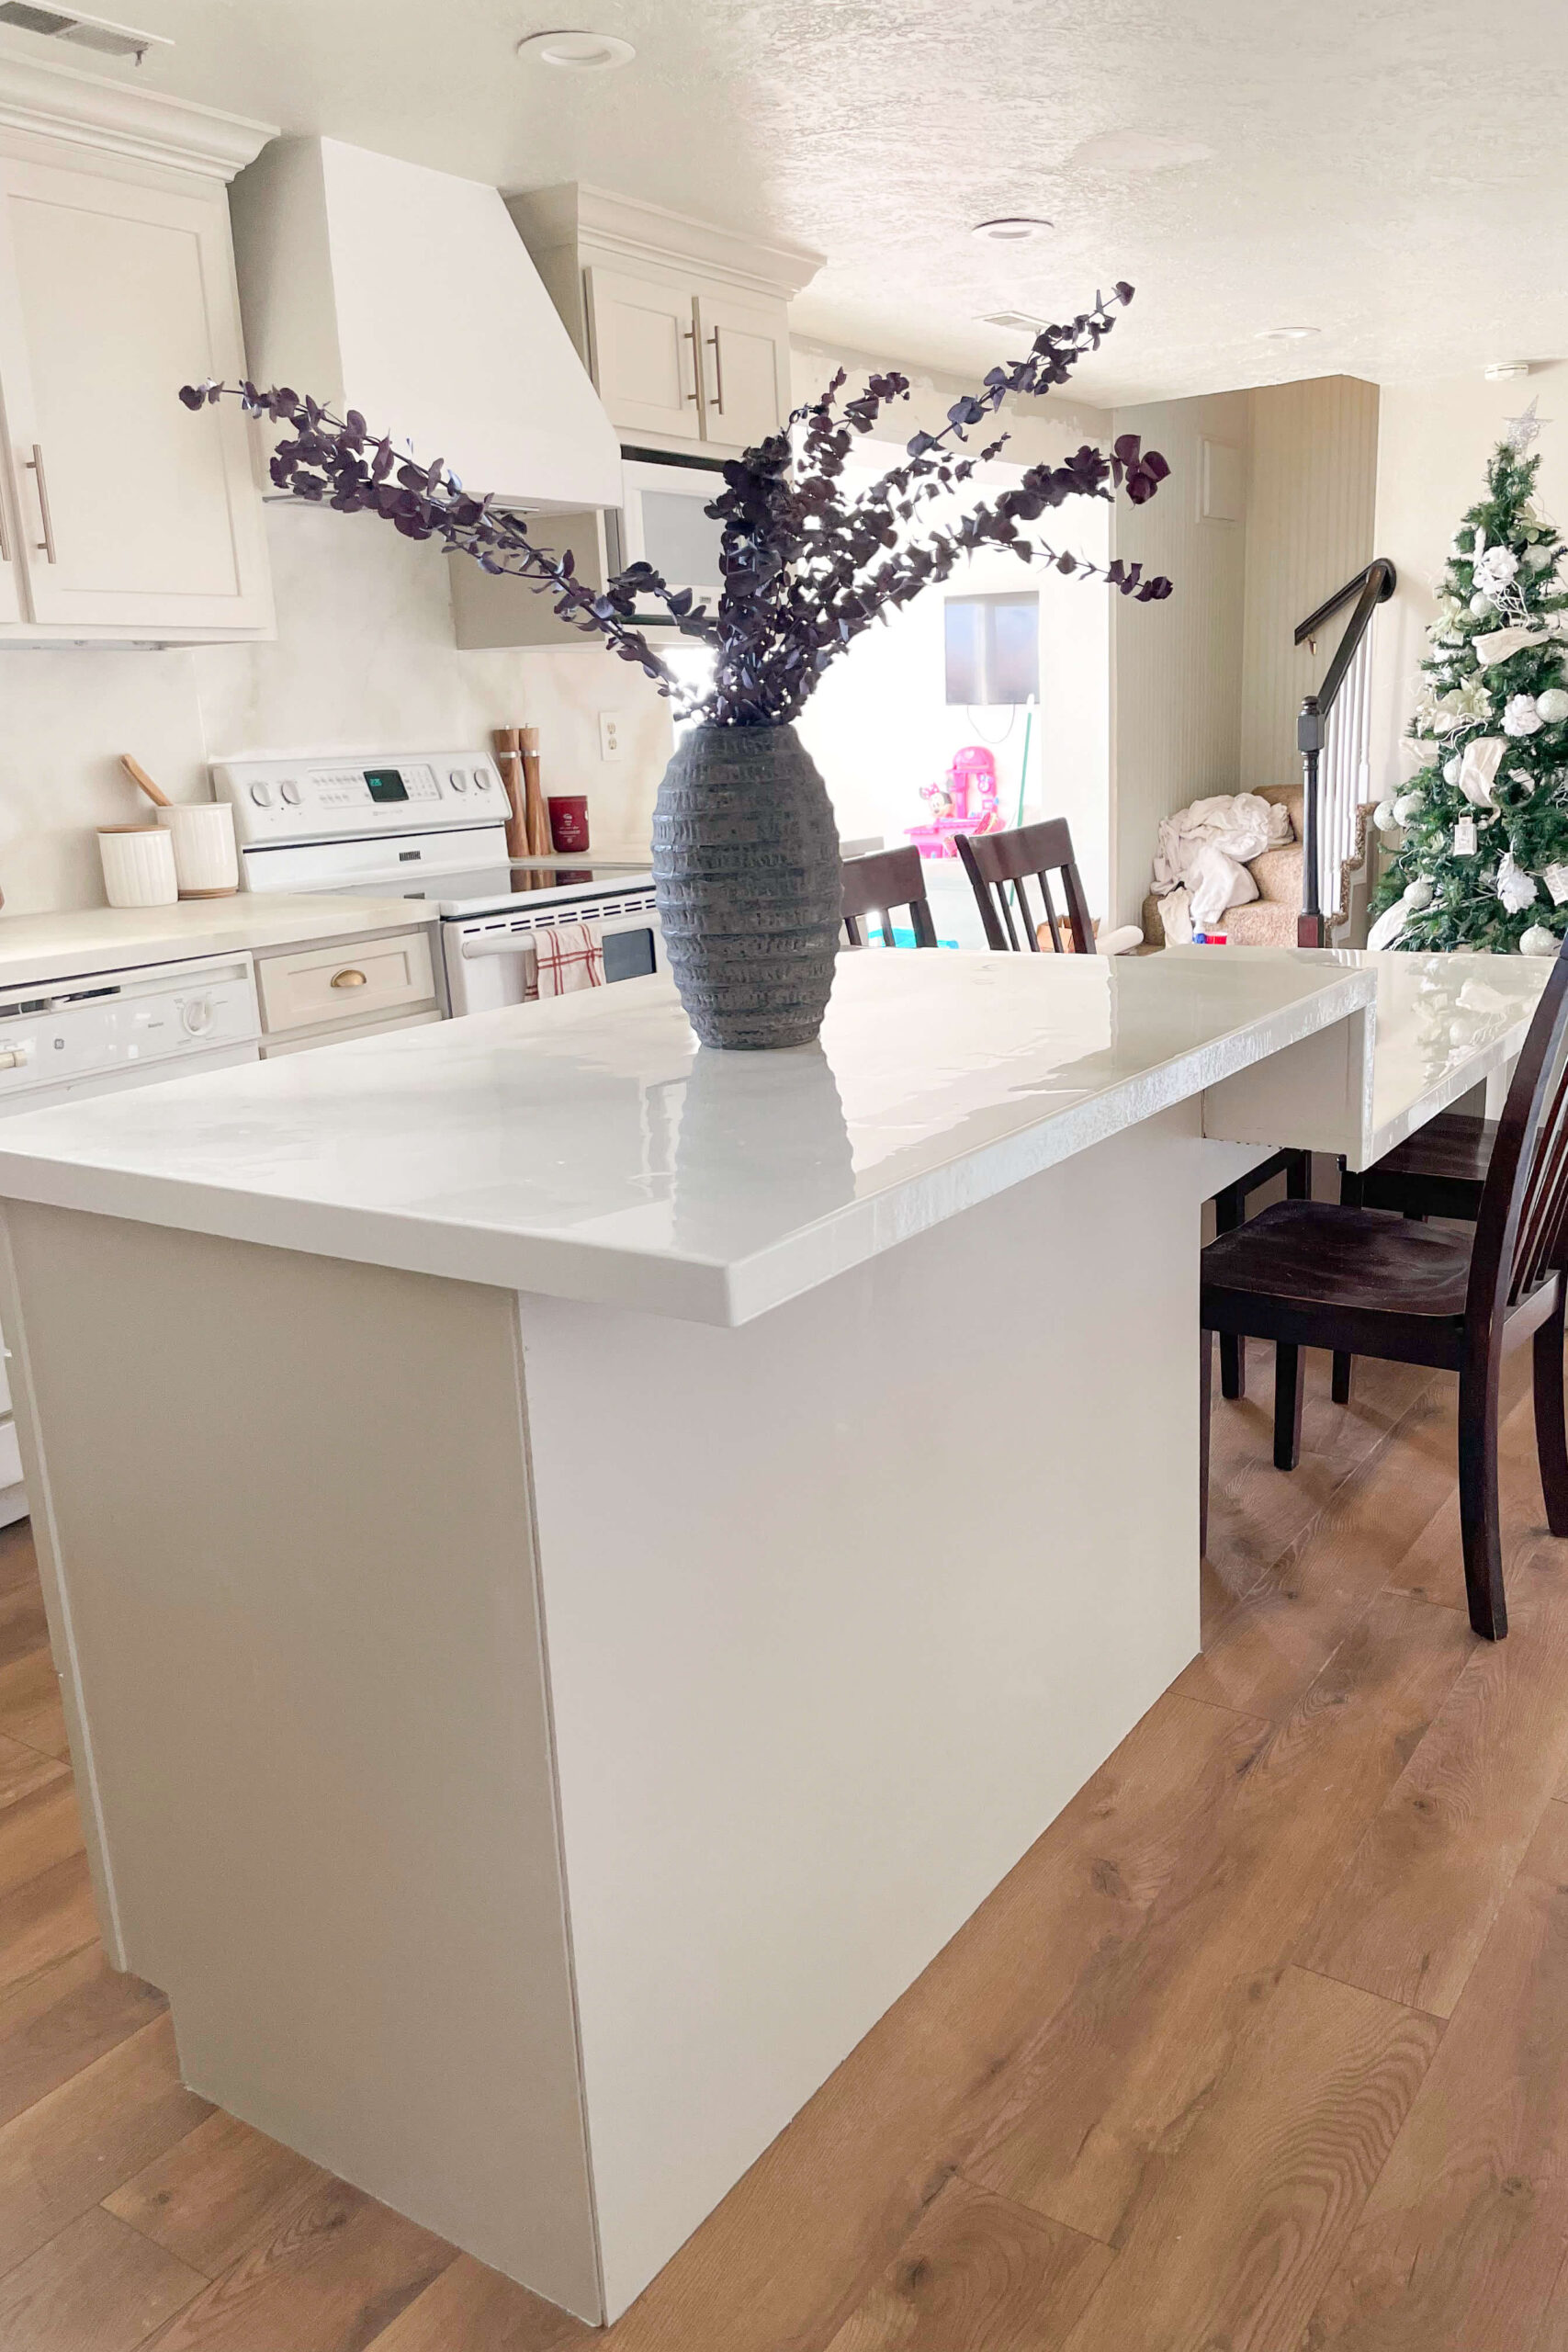 Completed pony wall island with a durable countertop and decorative baseboard trim
Credit: crystelmontenegrohome.com
Completed pony wall island with a durable countertop and decorative baseboard trim
Credit: crystelmontenegrohome.com
Common Pony Wall Mistakes to Avoid
Even experienced DIYers run into these avoidable issues:
- Skipping level checks during framing: Even a 1/4-inch tilt in the frame will make the countertop wobble and the finish look uneven. Use a 4-foot level on every stud during assembly, and a laser level for the entire wall once positioned.
- Using the wrong fasteners: Drywall screws will snap under the weight of a stone countertop. Use 3-inch wood screws for framing, 1.25-inch drywall screws for sheathing, and stainless steel screws for countertop mounting to resist corrosion.
- Ignoring subfloor type: Screwing directly into a concrete slab without masonry anchors will cause the frame to shift over time. Always use the correct fastener for your floor type.
- Rushing mud and sanding: Applying thick coats of joint compound will lead to long drying times and a bumpy finish. Apply thin, even coats, and sand between each for a smooth surface.
- Forgetting utility access: If you plan to add outlets or a sink to the island, run wiring and plumbing before installing drywall, not after. Cutting into finished drywall to add utilities is time-consuming and messy.
- Skipping safety PPE: Always wear safety glasses, work gloves, and an N95 mask when cutting lumber, drywall, or sanding. For electrical work, hire a licensed electrician to ensure code compliance and avoid shock hazards.
Using Your New Pony Wall Island for Entertaining
Your new pony wall does more than define your kitchen space—it creates the perfect spot for casual dining, homework, and hosting. The space under the countertop can be customized with open shelving, cabinet doors, or even a built-in wine rack to store glassware, serveware, and entertaining essentials. If you love hosting dinner parties or wine tastings, you can stock your new storage with home wine making kits to make homemade beverages for guests. For beginners, beginner-friendly wine supplies make it easy to experiment with small batches, while seasoned home vintners can store oak barrels for aging in adjacent cabinetry. Keep wine making accessories on hand for last-minute batches, and your island will become the go-to spot for every gathering. If you’re also updating your sink setup as part of this island project, swapping outdated sink fixtures is a simple way to add extra functionality.
Frequently Asked Questions
What is the standard height for a kitchen island pony wall?
Standard counter-height pony walls are 36 inches tall, matching standard kitchen counter height for comfortable food prep and casual dining. Bar-height pony walls are 42 inches tall, ideal for casual entertaining and bar stool seating. For a two-tiered island, you can build the main pony wall to 36 inches and add a raised bar section to 42 inches on one side for extra flexibility.
Do pony walls require footings like full load-bearing walls?
No, pony walls are non-structural in most residential applications, so they do not require concrete footings. You only need to anchor them securely to the existing floor and adjacent walls. If your pony wall is load-bearing (supporting upper floor joists or roof weight), you will need to consult a licensed structural engineer and install proper footings per local building codes.
Can I build a pony wall on an uneven floor?
Yes, but you will need to use shims under the bottom plate to level the frame before securing it to the floor. For floors with more than 1/2 inch of unevenness, you may need to pour a small concrete leveling pad first to avoid a wavy finished wall. A laser level is the most accurate tool for checking floor flatness before starting your build.
How much does it cost to build a pony wall for a kitchen island?
A basic 6-foot pony wall built with 2×4 framing, drywall, and paint costs $200–$400 in materials, not including the countertop. Adding tile, quartz countertops, or custom trim can push the total cost to $800–$1,500, which is a fraction of the cost of hiring a contractor for the same build.
Can I add electrical outlets to my pony wall?
Yes, but you must run wiring before installing drywall, and most jurisdictions require a permit for electrical work. If you are not comfortable with electrical work, hire a licensed electrician to install outlets and under-island lighting to meet local safety codes.
Conclusion
A well-built pony wall transforms your kitchen island from a simple counter extension into a defined, multi-functional space that works for everything from morning coffee to casual entertaining. Unlike a full wall, it preserves the open, airy feel of your kitchen while adding subtle structure, extra seating, and valuable storage space. By following this guide, you’ll avoid the common pitfalls that trip up first-time DIYers, and end up with a custom feature that looks professionally installed. Remember to check local permit requirements, use proper anchoring for your floor type, and take your time with mudding and sanding for a flawless finish. If you’re planning more kitchen upgrades as part of your renovation, our guide to swapping outdated sink hardware makes it easy to update your island’s faucet without damaging your new finishes.