
How to Remove Oil Grease from Kitchen Walls: Easy and Effective Tips
Stubborn oil grease on kitchen walls is one of the most common (and frustrating) cleaning challenges for home cooks. Even with regular wiping, that sticky, yellowed film builds up over time from cooking splatters, airborne oil particles, and daily steam, leaving your space feeling dingy and unhygienic. Unlike regular dirt, grease bonds to wall surfaces on a molecular level, so a quick wipe with water often just spreads the residue further. In this 2026 guide, we’ll walk you through tested, wall-safe methods to lift even baked-on grease without harsh chemicals or damaging your paint, plus practical tips to prevent buildup from coming back. Whether you’re dealing with light film on painted drywall or thick, years-old grease on tile, these steps will restore your walls to a spotless, fresh finish in no time. You can also read our guide on how to organize kitchen tools.
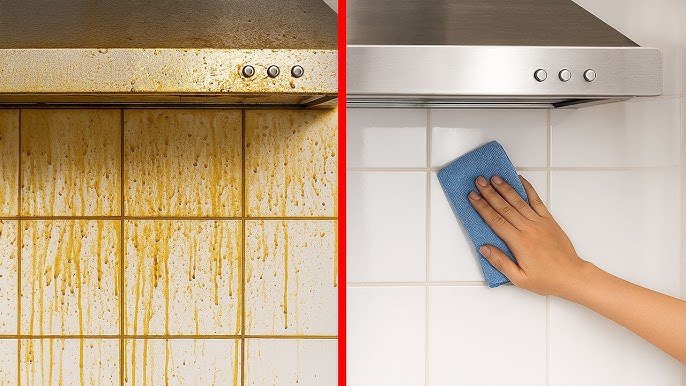
 Stubborn grease buildup on a kitchen wall near a stovetop, a common issue for frequent home cooks.
Why Grease Builds Up on Kitchen Walls
Grease accumulation isn’t just a sign of a messy kitchen — it’s a predictable result of how cooking byproducts interact with your wall surfaces. Understanding the root causes helps you target prevention and choose the right cleaning method for your specific buildup:
Cooking Without Adequate Ventilation
Cooking releases tiny oil aerosols into the air that settle on nearby surfaces within minutes. Without proper ventilation, these particles form a sticky, invisible film that darkens into visible grease over time. In practice, even 10–15 minutes of unvented high-heat cooking (like frying bacon or searing meat) can leave a noticeable greasy residue on walls within 2–3 weeks, especially on surfaces within 60cm of the cooktop. Low-heat, long-duration cooking like simmering sauces releases smaller amounts of grease over time, which still accumulates into stubborn buildup if left unaddressed. The EPA recommends running your range hood for at least 15 minutes after cooking to capture residual grease and improve indoor air quality EPA indoor air quality guidance for kitchens. You can also read our guide on how to clean oil grease from kitchen wall.
Frequent High-Heat Cooking
Frying, sautéing, and searing at high temperatures spray microscopic oil droplets into the air that stick to cool wall surfaces. If your kitchen regularly carries an oily smell after cooking, your walls are likely coated in a thin layer of this airborne grease. Open-top cooking like stir-frying or deep-frying produces far more airborne grease than baking or boiling. You can also read our guide on how to paint wall tiles in kitchen.
Infrequent or Ineffective Cleaning
Grease is naturally sticky, so it traps dust, food particles, and other debris over time. If you only wipe walls with a dry cloth or plain water, you’re not breaking the grease bond — you’re just spreading it into a thin, uneven film. Skipping cleanings for more than 2–3 weeks allows layers to build up, turning light surface grease into thick, yellowed stains that require heavy scrubbing to remove. You can also read our guide on how to clean kitchen grease off walls.
Low-Quality or Unsealed Wall Finishes
Unsealed drywall, matte paint, and uncoated wallpaper absorb grease far faster than smooth, sealed surfaces. If your kitchen walls were painted with a flat, low-sheen finish or left unsealed, grease will penetrate the top layer within weeks, making surface cleaning ineffective until you address the saturated material underneath. You can also read our guide on how to clean kitchen wall tiles easily.
Proximity of Cooking Surfaces to Walls
Stovetops, griddles, and deep fryers placed less than 30cm from the wall produce direct splatter and steam that hits the wall surface at full force. This close contact accelerates grease buildup dramatically, especially if you don’t use a splatter guard while cooking. You can also read our guide on how to install a kitchen range hood wall vent.
Essential Supplies for Safe, Effective Grease Removal
Using the right tools and cleaners will cut your cleaning time in half and prevent accidental damage to your walls. Avoid harsh, unregulated degreasers, abrasive scrubbers, and excess water, which can strip paint, discolor wallpaper, or cause water damage to drywall. Gather these supplies before you start:
Cleaning Solutions
- Mild dish soap: A gentle surfactant that lifts grease molecules from surfaces without damaging most paints or finishes. Mix 1 tsp of liquid dish soap with 2 cups of warm water for light grease.
- White vinegar: Acetic acid dissolves grease bonds and deodorizes, making it ideal for medium buildup. Mix equal parts white vinegar and water for an all-purpose spray cleaner.
- Baking soda: A pH-neutral mild abrasive that scrubs away thick grease without scratching surfaces. Mix with a small amount of warm water to form a thick paste for spot treating stains.
- Castile soap: A plant-based, biodegradable soap safe for delicate wallpapers and painted surfaces. Dilute 1 tbsp in 2 cups of warm water for a gentle, all-over clean.
- Non-abrasive commercial degreaser: For heavy, baked-on grease, choose a product labeled safe for painted surfaces and food-adjacent areas. The FDA recommends using cleaning products labeled safe for food-contact surfaces near cooking spaces to avoid harmful residues FDA safe cleaning product guidelines.
Scrubbing Tools
- Microfiber cloths: Lint-free and soft, these lift grease without scratching paint or wallpaper. Keep a stack on hand for wiping and rinsing.
- Soft sponges: Non-abrasive cellulose sponges work well for gentle scrubbing on delicate surfaces.
- Soft-bristled nylon brush: Ideal for textured walls, tile grout, and small crevices where grease hides. Avoid steel wool or stiff wire brushes, which can damage wall finishes.
Protective Gear
- Nitrile gloves: Protect your skin from grease, cleaning solutions, and grime.
- Safety glasses: Prevent cleaning solution splatters from getting into your eyes, especially when working overhead.
- Old clothes or an apron: Avoid staining your regular clothing with grease or cleaner residue.
Prep Supplies
- Painter’s tape: Protect baseboards, trim, and nearby surfaces from cleaner splatters.
- Drop cloths or old towels: Cover floors and countertops to catch drips and prevent water damage.
- Spray bottle: For even application of vinegar-water or soap solutions.
- Dry microfiber towels: For drying walls immediately after cleaning to prevent water marks and moisture damage.
When stocking up on cleaning cloths, sponges, and protective gear, you can find all the durable home essentials you need alongside your favorite hobby supplies home beer and wine making gear. You can also read our guide on how to decorate my kitchen walls.
Preparation Steps Before Cleaning
Proper prep prevents water damage, stained surfaces, and ruined trim, and makes the actual cleaning process far faster. Follow these steps before you start scrubbing:
- Clear all wall decor, picture frames, and small items from the greasy area to get full access to the surface.
- Cover floors and countertops with drop cloths or old towels, and tape baseboards and trim with painter’s tape to protect them from splatters.
- Open windows or turn on your range hood to ventilate the area, especially if you’re using vinegar or commercial cleaners with strong fumes.
- If you have a wall-mounted faucet in the greasy zone, take it off first to avoid water damage during cleaning; our safe faucet removal guide walks you through the process without scratching your walls safe faucet removal.
- Spot-test any cleaning solution on an inconspicuous area (like behind the fridge or inside a closet) for 5 minutes before applying it to the main wall. Wipe the test area, wait 10 minutes, and check for discoloration, peeling, or texture changes.
Step-by-Step Grease Removal Process
Follow this process to lift grease without damaging your walls, tailored to the severity of your buildup:
Treat Light, Surface-Level Grease
For thin, recently formed grease film that hasn’t yellowed or hardened:
- Mix 1 tsp of mild dish soap with 2 cups of warm water in a spray bottle.
- Spray the solution onto a clean microfiber cloth (never directly onto the wall, as oversaturation can damage drywall or cause paint to peel).
- Wipe the greasy area in small, circular motions, working from the bottom of the stain upward to avoid drips.
- Follow up with a cloth dampened with plain warm water to remove soap residue.
- Dry the wall immediately with a clean, dry microfiber towel to prevent water marks.
Tackle Stubborn, Baked-On Grease
For thick, yellowed grease that has built up over months or years:
- Make a thick baking soda paste by mixing 3 parts baking soda with 1 part warm water.
- Apply the paste directly to the stain, covering it completely with a 2–3mm layer.
- Let the paste sit for 15 minutes to break down the grease bonds. Do not let it dry completely, as this can make it harder to remove.
- Gently scrub the area with a soft-bristled nylon brush or a clean toothbrush for small spots, working in circular motions.
- Wipe away the paste and loosened grease with a cloth dampened with equal parts white vinegar and water to neutralize any remaining residue.
- Rinse the area with a plain water-dampened cloth, then dry thoroughly with a clean towel.
A common mistake homeowners make is using abrasive scrubbers or harsh chemicals on stubborn grease, which can strip paint or leave permanent scuff marks. Patience and repeated light treatments work far better than aggressive scrubbing. You can also read our guide on how to stop kitchen cabinet door from hitting wall.
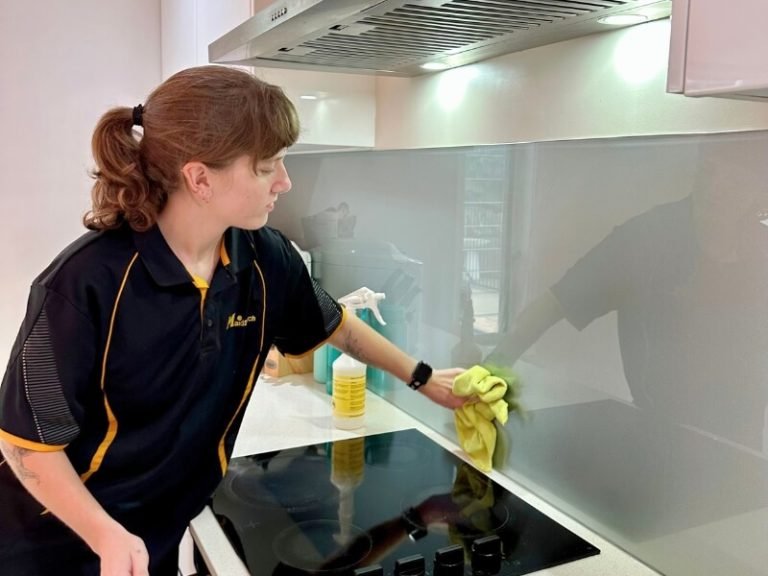
 Wiping grease with a microfiber cloth is the first step to lifting surface residue before deep cleaning.
Natural vs. Commercial Cleaners: Which Is Right for You?
Both natural and commercial cleaners have their place in grease removal, depending on the severity of your buildup and your wall type. Use this quick comparison to pick the best option for your needs:
| Cleaner Type | Best For | Pros | Cons | Safety Notes |
|---|---|---|---|---|
| Baking soda paste | Stubborn spot stains, painted drywall | Non-abrasive, pH-neutral, cheap, no harsh fumes | Requires 15-minute sit time, less effective on heavy buildup | Safe for all painted surfaces and tile; avoid on natural stone |
| Vinegar-water solution | Medium buildup, routine maintenance | Cuts grease effectively, deodorizes, eco-friendly | Strong vinegar smell, not suitable for natural stone or unsealed surfaces | Safe for painted drywall, tile, glass; test on wallpaper first |
| Castile soap solution | Delicate surfaces like wallpaper, routine cleaning | Gentle, plant-based, no harsh chemicals | Less effective on thick, baked-on grease | Safe for all wall types when diluted properly |
| Heavy-duty commercial degreaser | Heavy, years-old buildup, tile or sealed surfaces | Cuts through thick grease quickly, minimal scrubbing needed | Strong fumes, can damage unsealed surfaces if not tested | Wear gloves and ventilate well; only use on surfaces labeled safe for the product |
| Citrus-based commercial cleaner | Medium to heavy buildup, eco-friendly preference | Pleasant scent, natural solvents, less harsh than heavy-duty degreasers | More expensive than DIY options, may require multiple applications | Safe for most sealed surfaces; avoid on unsealed wood or stone |
In practice, natural cleaners work perfectly for 80% of household grease buildup, while commercial degreasers are only necessary for extreme, long-neglected stains. You can also read our guide on how to decorate small kitchen walls.
How to Clean Different Kitchen Wall Surfaces
Grease removal varies drastically depending on your wall material, as porous surfaces absorb grease while non-porous surfaces only hold surface residue. Use these targeted methods for your specific wall type:
Painted Drywall
The most common kitchen wall surface, painted drywall is porous and easily damaged by excess moisture or harsh scrubbing. Use only mild dish soap solutions or baking soda paste for spot stains, and avoid oversaturating the surface. For unsealed drywall with deep grease penetration, you may need to spot-prime and repaint the affected area after cleaning. If you’re planning to repaint, prepping walls for new paint properly ensures the new coat adheres evenly and won’t peel from residual oil prepping walls for new paint. You can also read our guide on how to fix wall tiles in kitchen.
Ceramic or Subway Tile
Tile is non-porous, so grease sits only on the surface and is far easier to remove. For light grease, use a vinegar-water solution and a sponge. For thick buildup or dirty grout lines, apply a baking soda paste to the grout, let sit 10 minutes, scrub with a soft-bristled brush, then rinse. You can use a heavy-duty commercial degreaser on tile without risk of damage, as long as you rinse thoroughly after cleaning. You can also read our guide on how long does it take to tile a kitchen wall.
Wallpaper
Most wallpaper is water-sensitive, so avoid spraying liquid directly onto the surface. Instead, dip a soft cloth in a diluted dish soap solution (1 tsp soap per 2 cups water), wring it out until it is barely damp, and gently blot the greasy area. Never use vinegar, abrasive scrubbers, or excess water on wallpaper, as these can dissolve the adhesive or cause the paper to peel. For washable vinyl wallpaper, you can use a slightly damp cloth with mild soap, but always test in an inconspicuous area first. You can also read our guide on how to fix a leaking wall mounted kitchen faucet.
Exposed Brick or Stone
Natural brick and stone are porous and can be etched by acidic cleaners like vinegar. Use a pH-neutral stone cleaner or a diluted castile soap solution for grease removal. Avoid abrasive scrubbers, which can scratch the surface. For heavily soiled brick, you may need a specialized masonry degreaser, but always test it on a small, hidden area first to avoid discoloration. You can also read our guide on how to regrout kitchen wall tiles.
Preventing Future Grease Buildup
Consistent small habits will cut down on deep cleaning sessions and keep your walls looking fresh for months. These tips are tested by home cooks to reduce grease accumulation with minimal effort:
Run Your Range Hood Every Time You Cook
Even for low-heat cooking like simmering or boiling, run your range hood for 10–15 minutes after you finish cooking to capture residual grease particles. If you don’t have a range hood, open a window near the cooktop and place a small fan facing outward to pull airborne grease away from walls. You can also read our guide on how to clean sticky kitchen walls.
Wipe Walls Weekly with a Damp Cloth
A quick 5-minute wipe with a microfiber cloth dampened with warm, soapy water once a week prevents grease from hardening and bonding to the wall surface. This small habit eliminates the need for monthly deep cleans for most households. You can also read our guide on how to remove tile backsplash from kitchen wall.
Install a Grease-Catching Backsplash
If your kitchen doesn’t already have one, install a tile, glass, or stainless steel backsplash that extends at least 30cm above your cooktop. These non-porous surfaces catch most grease splatters before they reach the upper walls, and they are extremely easy to wipe clean after cooking. You can also read our guide on how to clean oil stains from kitchen walls.
Use a Splatter Guard While Cooking
A simple mesh splatter guard placed over pans while frying or sautéing stops the majority of airborne grease droplets from reaching wall surfaces. These guards are inexpensive, dishwasher-safe, and reduce splatter on countertops and walls alike. You can also read our guide on best fabric for cloth napkins.
Choose a Grease-Resistant Wall Finish
If you’re repainting your kitchen, opt for a semi-gloss or satin finish rather than flat or matte paint. These sheens have a smooth, non-porous surface that repels grease and makes wiping almost effortless. For homeowners with green cabinetry, complementary wall hues for green kitchen cabinets in a semi-gloss finish will create a cohesive, easy-to-clean space complementary wall hues. For those with brown cabinetry, coordinating your wall color with a warm neutral semi-gloss finish hides minor grease spots between deep cleans coordinating your wall color. You can also read our guide on how to protect wall behind kitchen sink.
Keep the Cooking Area Clutter-Free
Remove excess items from countertops and the area around your stove, as clutter creates hidden grease traps that are hard to clean. Wipe down countertops and backsplashes after every cooking session to stop grease from spreading to nearby walls. A clutter-free cooking space not only reduces grease buildup but also makes it easier to access your cleaning supplies, whether you’re prepping a weeknight dinner or hosting pasta and wine evenings with our curated guide pasta and wine evenings. You can also read our guide on how to wash kitchen walls.
When to Call a Professional
Most grease buildup can be handled at home with the methods above, but there are cases where professional help is the safest, most cost-effective option. Call a professional cleaning service or wall contractor if you notice any of these signs:
Deep Grease Penetration into Wall Material
If grease has seeped into drywall or plaster, you’ll see yellow stains that bleed through even after thorough cleaning, or large areas of peeling, bubbly paint. In this case, the saturated wall material needs to be replaced or professionally treated to remove embedded grease, which is not a DIY-friendly job. You can also read our guide on what colour walls for a white kitchen.
Persistent, Rancid Odors
If your kitchen still smells like old, spoiled grease after multiple deep cleans, the grease has likely seeped into wall cavities, insulation, or gaps between tiles. Professionals have industrial-grade degreasers and extraction tools that can remove hidden grease and eliminate odors completely, which is impossible to achieve with household cleaners. You can also read our guide on how to repair kitchen wall after removing tile.
Fire Hazard Risks
Thick, accumulated grease is flammable, and even a small cooking splatter can ignite it. If you notice a sticky, greasy layer on walls near your stove that feels tacky to the touch, or you’ve had a small grease fire in the area, have a professional remove the flammable residue immediately to reduce fire risk. You can also read our guide on how to remove wall tile in kitchen.
Delicate or Historic Wall Finishes
If you have custom murals, historic plaster, or high-end specialty paint on your kitchen walls, aggressive scrubbing or harsh cleaners can cause irreversible damage. A professional with experience in historic or custom wall finishes will use gentle, targeted methods to remove grease without ruining your investment. You can also read our guide on how to clean kitchen walls grease.
Time or Physical Limitations
Deep cleaning kitchen walls requires standing for long periods, reaching overhead, and scrubbing, which can be difficult for people with mobility issues, back pain, or busy schedules. Professional kitchen wall cleaning typically costs between $150–$400 for a standard residential kitchen, depending on the severity of buildup and wall type, and saves you hours of labor. You can also read our guide on what to use to clean grease off kitchen walls.
 A homemade vinegar and baking soda solution is safe for most painted kitchen walls and cuts through grease effectively.
Frequently Asked Questions
Can I use bleach to clean grease off kitchen walls?
No. Bleach can discolor paint, dissolve wallpaper adhesive, and release harmful fumes when mixed with other common cleaning products like vinegar. Stick to mild dish soap, vinegar, or non-abrasive degreasers for safe, effective grease removal. You can also read our guide on rta kitchen design tool.
Will grease stains come out of painted walls without repainting?
Most surface-level grease stains will lift completely with proper cleaning, even from painted walls. If grease has penetrated deep into the paint or drywall, you may need to spot-prime and repaint the affected area after cleaning to restore the finish. You can also read our guide on what are good colors for kitchen walls.
Is vinegar safe for all kitchen wall types?
Vinegar is safe for sealed painted drywall, ceramic tile, and glass surfaces. Avoid using vinegar on natural stone (like marble or granite), unsealed wood, and wallpaper, as its acidic content can etch stone, warp wood, or dissolve wallpaper adhesive. You can also read our guide on how to choose paint color for kitchen walls.
How do I remove grease from kitchen wall grout?
Make a paste of 2 parts baking soda and 1 part hydrogen peroxide, apply it to the grout lines, let sit for 10 minutes, then scrub with a soft-bristled toothbrush. Rinse with plain water and dry thoroughly for a stain-free finish. You can also read our guide on how to change wall colour in ikea kitchen planner.
How often should I clean my kitchen walls to prevent grease buildup?
For most households, wiping walls with a damp soapy cloth once a week is enough to prevent grease from hardening. Do a deep clean with baking soda or vinegar every 1–2 months to tackle any accumulated residue before it becomes stubborn. You can also read our guide on how to remove kitchen wall tile.
Final Tips for a Grease-Free Kitchen
Removing oil grease from kitchen walls doesn’t have to be a time-consuming, backbreaking chore. With the right supplies, targeted methods for your wall type, and consistent small habits, you can keep your walls looking fresh and clean with minimal effort. For light buildup, natural cleaners like dish soap, vinegar, and baking soda are more than enough to lift grease without harsh chemicals. For stubborn, years-old stains, a little patience and repeated gentle treatments will get the job done without damaging your walls. You can also read our guide on how to remove kitchen tiles from wall.
Remember, prevention is far easier than removal: running your range hood, wiping walls weekly, and using a splatter guard while cooking will cut down on deep cleaning sessions dramatically. If you do encounter extensive grease damage or persistent odors, don’t hesitate to call a professional to avoid costly wall repairs down the line. You can also read our guide on how to remove grease stains from painted kitchen walls.
Ready to tackle your greasy walls today? Grab your supplies and follow our step-by-step guide for a spotless, fresh cooking space in under an hour. You can also read our guide on how to clean kitchen walls.


One Comment