How to Repair Kitchen Wall After Removing Tile: Easy Step-by-Step Guide
Removing an old kitchen tile backsplash is a high-impact, low-cost way to refresh your space, but it often leaves behind a mess of sticky adhesive, gouged drywall, and hidden damage that can derail your remodel if not addressed correctly. Whether you’re prepping for a full kitchen refresh or just updating one accent wall, repairing the wall after tile removal is a straightforward DIY project that saves you $300–$800 in professional labor costs, as long as you follow the right steps in order. This guide covers everything from initial damage assessment to a flawless painted or tiled finish, with pro tips to avoid the common mistakes that leave DIYers with peeling paint or falling tiles months later. Even careful tile removal can cause minor wall damage, but protecting walls during demo upfront reduces the amount of patching you need to do later. You can also read our guide on how to install kitchen cabinets on uneven walls.
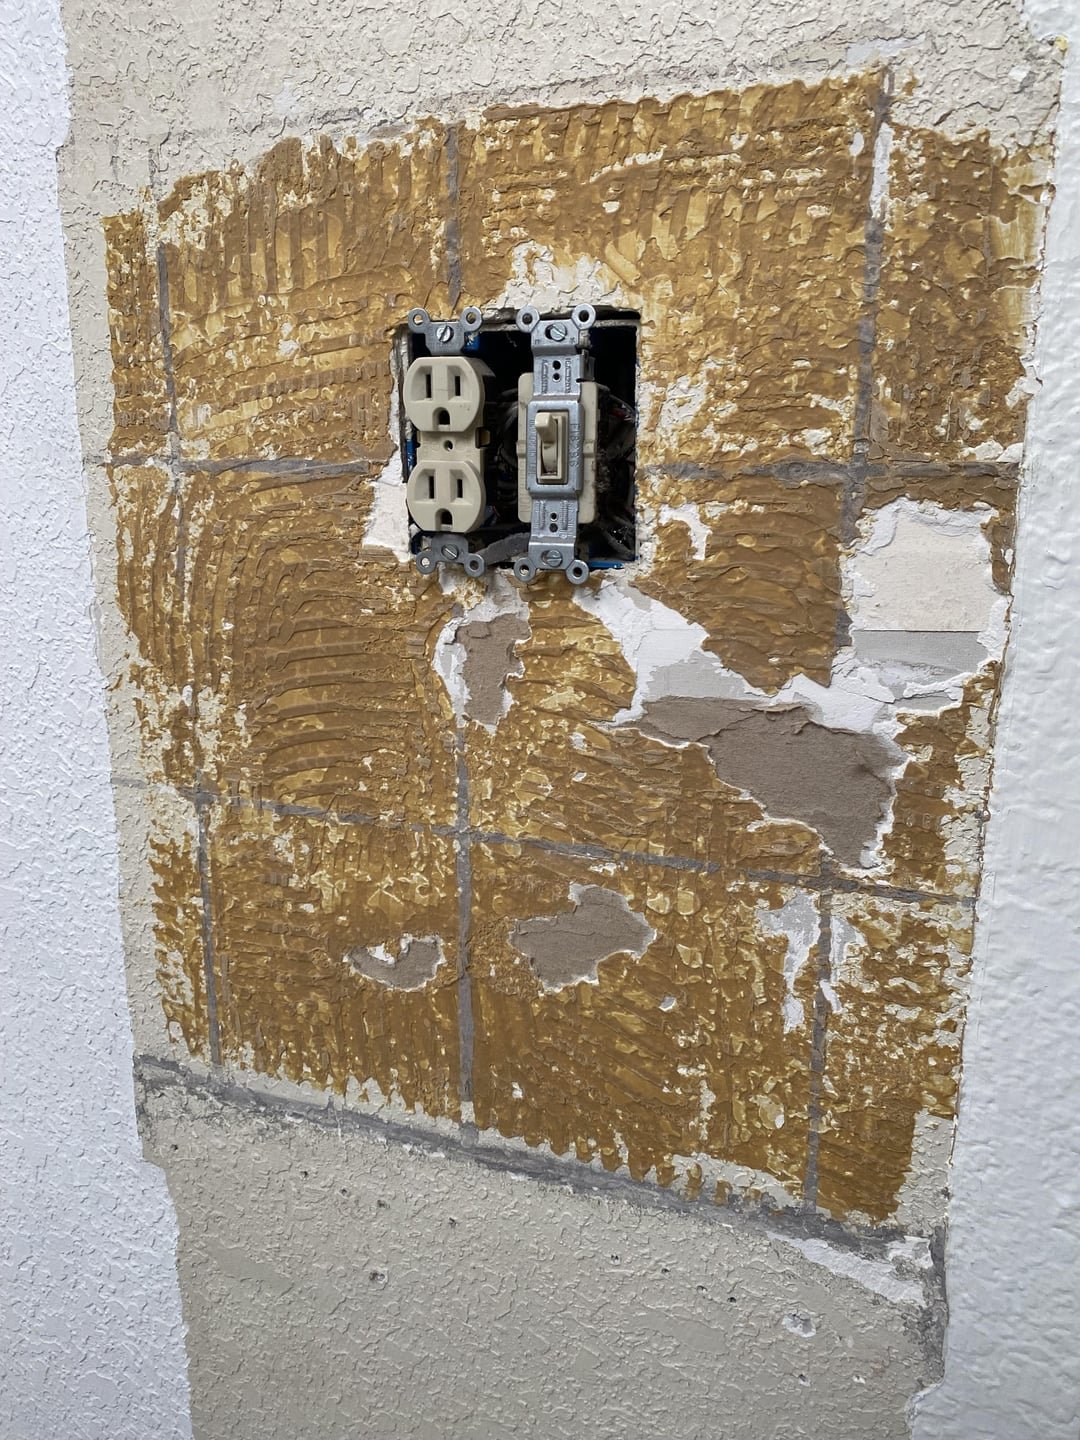
Leftover thinset adhesive is the most common residue left after tile removal, and must be fully cleared before patching.
Assess Your Wall’s Condition First
Before you start scraping or patching, take 10 minutes to assess what you’re working with to avoid unnecessary work and catch hidden issues early. This step ensures you have the right tools and products for your specific wall type and damage level. You can also read our guide on how to retile a kitchen wall.
Identify Your Wall Type
Most post-1950s homes have drywall (gypsum board covered in paper facing) as their interior wall material, while older homes may have plaster (a lime or gypsum mixture applied over wood lath). Plaster is more durable than drywall but also more brittle, so it requires gentler scraping to avoid chipping large sections. If you’re unsure of your wall type, tap on it: drywall has a hollow sound, while plaster sounds solid and dense. You can also read our guide on how to clean kitchen walls grease.
Check for Hidden Damage
Use a bright work light held at a low angle to spot soft spots, dark water stains, or cracks wider than 1/8 inch, which may indicate structural damage or hidden moisture. Press firmly on the wall with your thumb: if it gives or feels damp, you likely have water damage behind the surface that needs to be fixed before you start patching. For hard-to-detect moisture, use a $20 hardware store moisture meter to get an accurate reading—per the U.S. Environmental Protection Agency, moisture levels above 15% in interior walls indicate active water intrusion that must be addressed first to avoid mold growth. You can also read our guide on how to remove kitchen cabinets without damaging wall.
Prep the Wall Surface
Proper surface prep is the most critical step in a long-lasting repair—skipping it is the number one cause of peeling paint, failed tile adhesion, and cracked patches down the line. You can also read our guide on what paint to use on kitchen walls.
Remove Leftover Adhesive and Mortar
After tile removal, you’ll almost always have leftover thinset (the cement-based adhesive used for modern tile) or mastic (organic adhesive used in older installations) clinging to the wall. Start by using a 2-inch plastic putty knife to chip away bulk adhesive, holding the scraper at a 45-degree angle to avoid gouging the wall. For stubborn bits, use a heat gun set to 300–400°F to soften the adhesive, making it easier to scrape off. A common mistake DIYers make is using a metal scraper on drywall, which tears the paper facing and creates larger holes to patch later—stick to plastic scrapers for the first pass, and use a metal scraper only for thick, cured thinset on plaster walls. For mastic residue, a citrus-based adhesive remover works better than harsh solvents; let it sit 5–10 minutes per the product label before scraping. You can also read our guide on how to remove kitchen wall tile.
Deep Clean Grease and Debris
Even after scraping, fine dust and hidden kitchen grease will remain on the wall. Start by vacuuming the entire surface with a brush attachment to remove loose dust, then wipe the wall with a trisodium phosphate (TSP) solution (1/2 cup TSP per gallon of warm water) to cut through baked-on cooking grease that regular soap can’t remove. Rinse with a damp sponge, then let the wall dry completely—use a fan to speed up drying if needed, and wait at least 2 hours, or overnight if your kitchen has high humidity. Kitchen walls accumulate layers of cooking grease over time, which even thorough scraping can leave behind; removing stubborn kitchen grease with a dedicated cleaner ensures new finishes adhere properly. You can also read our guide on how to clean kitchen wall tiles easily.
Inspect and Mark All Damage
Once the wall is clean and dry, use your work light to scan for all cracks, holes, gouges, and crumbling areas. Mark each spot with a pencil so you don’t miss any during patching. Small hairline cracks (under 1/8 inch wide) can be filled with latex caulk, while holes 1/4 to 1 inch wide work well with spackle. For holes larger than 1 inch, or crumbling plaster, you’ll need a drywall patch or full section replacement. If you spot any mold, dark water stains, or soft spots, address the underlying moisture issue first (fix leaky pipes, improve ventilation) per U.S. Centers for Disease Control and Prevention (CDC) mold prevention guidelines to avoid long-term health risks and repair failure. You can also read our guide on how to clean kitchen walls for painting.
 Common wall damage after tile removal includes gouged drywall paper, small holes, and uneven surfaces from chipped adhesive.
Repair Damaged Wall Sections
Once your wall is clean and all damage is marked, you can start patching. The products and techniques you use will depend on the size and severity of the damage. You can also read our guide on how to remove grease stains from painted kitchen walls.
Fix Small Cracks and Holes
For hairline cracks: apply a thin bead of paintable latex caulk directly into the crack, smooth it with a damp putty knife, and let it dry for 1 hour. Apply a second thin coat if the crack is still visible after drying. You can also read our guide on what finish paint for kitchen walls. For holes 1/4 to 1 inch wide: clean out any loose debris from the hole, then apply a thin layer of joint compound with a 2-inch putty knife. Press a piece of paper or mesh drywall tape into the compound, then cover the tape with a second thin coat of compound, feathering the edges 2 inches beyond the hole so it blends seamlessly with the surrounding wall. Let the compound dry completely (1–2 hours for quick-drying formulas, 24 hours for standard joint compound). You can also read our guide on how to paint high walls above kitchen cabinets.
Patch Larger Damaged Areas
For holes 1–4 inches wide: cut a piece of 1/2-inch drywall 1 inch larger than the hole on all sides, trace it onto the wall, and cut out the damaged section with a drywall saw. Attach the new patch to the wall studs with drywall screws, countersinking the heads 1/8 inch below the surface. Cover the seams with mesh drywall tape and a thin coat of joint compound, feathering the edges 3–4 inches out to blend with the wall. Apply 2–3 thin coats of compound, letting each dry fully and sanding lightly between coats. You can also read our guide on how to clean kitchen wall grease. For crumbling plaster: scrape away all loose plaster down to the wood lath underneath, apply a coat of plaster bonding primer, then fill the area with a plaster patching compound, feathering the edges to match the existing wall texture. You can also read our guide on how to fix wall tiles in kitchen.
Sand Patches for a Smooth Finish
Once all patching compound is fully dry, sand the repaired areas with 120-grit sandpaper for initial smoothing, then finish with 220-grit sandpaper for a perfectly smooth surface. Use a sanding block or pole sander for large areas to avoid creating dips or uneven spots. Wipe away all dust with a tack cloth (a regular cloth will leave lint that ruins your final finish). In practice, waiting an extra 12 hours for joint compound to dry is far better than sanding a semi-dry patch, which will crack and shrink after painting. You can also read our guide on tools needed to replace kitchen faucet.
 Fully sanded patched areas should be flush with the surrounding wall with no rough edges before priming.
Prime the Wall for Long-Lasting Adhesion
Priming seals the repaired wall surface, blocks old stains and adhesive residue from bleeding through your final finish, and ensures paint or thinset adheres evenly. Skipping this step is the most common cause of repair failure within the first year. You can also read our guide on what type of paint to use on kitchen walls.
Choose the Right Primer for Your Wall
Not all primers are created equal: for porous patched surfaces or walls previously covered in oil-based paint, use a high-bond bonding primer to seal the surface and prevent uneven absorption. For walls in high-moisture areas (behind sinks, dishwashers, or stoves), opt for a mold-resistant primer with a mildewcide additive to prevent future mold growth. If you’re planning to retile after repairs, use a tile-backer primer to ensure thinset bonds securely to the repaired drywall. Matching primer to your wall’s needs—bonding for porous patches, moisture-resistant for wet areas—prevents finish failure down the line. You can also read our guide on how to paint wall tiles in kitchen.
Apply Primer Evenly and Correctly
Use a 3/8-inch nap roller cover for smooth walls, or a 1/2-inch cover for lightly textured walls, and a 2-inch angled sash brush for cutting in edges and corners. Apply thin, even coats, overlapping each roller pass by 50% to avoid lap marks. Thick coats of primer will drip, take longer to dry, and can create uneven surfaces that show through your final finish. Let the primer dry completely per the product label (1–2 hours for water-based formulas, 4 hours for oil-based), then sand lightly with 220-grit sandpaper if you see any rough spots, and apply a second thin coat if needed. You can also read our guide on how to prep greasy kitchen walls for painting.
Finish the Wall: Paint or Retile
Once the primer is fully dry, you can finish the wall with paint or new tile, depending on your kitchen refresh plans.
Paint the Repaired Wall
For kitchen walls, opt for stain-resistant paint with a satin or eggshell sheen: these finishes resist grease, moisture, and scuffs, and are easy to wipe clean with a damp sponge. Semi-gloss is even more durable, but will highlight any remaining wall imperfections, so only use it if your surface is perfectly smooth. Avoid flat/matte paint, as it absorbs stains and is impossible to clean in high-traffic kitchen areas. Apply 2–3 thin coats of paint, letting each dry 2–4 hours between coats, using a roller for large areas and a brush for edges and trim. Take time to test paint samples on your repaired wall first to ensure coordinating paint with your kitchen’s aesthetic looks good in different lighting. You can also read our guide on how to get rid of grease stains on kitchen walls.
Install New Tile (Optional)
If you’re retiling the backsplash after repairs, apply a thin layer of thinset mortar with a 1/4-inch notched trowel, pressing the tiles firmly into the mortar and using tile spacers to maintain even grout lines. Let the thinset cure for 24 hours, then apply unsanded grout with a rubber grout float, wiping excess grout off the tiles with a damp sponge. Seal the grout after 72 hours to prevent staining and moisture penetration. For large-format tiles (over 12 inches square), apply a layer of cement board over the repaired drywall first for extra support, to prevent tiles from cracking under weight. You can also read our guide on decorative wall tiles for kitchen.
Pro Tips to Avoid Costly Repair Mistakes
Even experienced DIYers run into avoidable issues with kitchen wall repairs. Keep these tips in mind for a flawless, long-lasting result:
- Don’t rush drying times: Applying paint or thinset before joint compound or primer is fully dry will cause peeling, bubbling, or cracking. Wait the full recommended drying time, even if it means pausing your project for an extra day.
- Don’t skip the moisture check: Hidden moisture behind the wall will ruin even the best patching job. Address leaks and improve ventilation before starting repairs if you detect dampness.
- Don’t over-sand patched areas: Sanding too aggressively creates low spots that show through paint. Sand only until the patched area is flush with the surrounding wall.
- Don’t use cheap primer: A low-quality primer won’t seal porous patches or block old stains, leading to uneven paint or failed tile adhesion. Spend the extra $5–$10 on a primer formulated for your wall’s specific needs.
When to Hire a Professional
While most minor kitchen wall repairs are DIY-friendly, there are cases where hiring a pro is worth the cost:
- The wall has extensive water damage, mold, or crumbling drywall/plaster covering more than 25% of the surface
- You need to replace large sections of drywall (over 2 feet square)
- You’re uncomfortable using power tools like drywall saws or sanders
- The wall is visibly bowed or cracked, indicating potential structural issues Professional repairs for a standard 10-foot kitchen backsplash wall cost $300–$800 on average, depending on damage severity and location, and will come with a work guarantee to ensure the job lasts. You can also read our guide on worlds best dish cloths.
Frequently Asked Questions
How long does a kitchen wall repair take after tile removal?
Total repair time depends on the extent of damage: minor repairs (small holes, light adhesive residue) take 1–2 days, including drying time for compound and primer. Extensive damage requiring full drywall replacement can take 3–5 days. Most of the waiting time is for products to dry, so plan to work on other parts of your kitchen remodel in between steps. You can also read our guide on what wall colour goes with grey kitchen units.
What materials do I need for this project?
You’ll need: plastic putty knives (2-inch and 4-inch), heat gun or citrus-based adhesive remover, TSP cleaner, joint compound (or spackle for small holes), drywall mesh tape, 120-grit and 220-grit sandpaper, sanding block, tack cloth, bonding primer (or moisture-resistant primer for wet areas), paint (satin/eggshell for kitchens), paint roller and angled sash brush, safety glasses, nitrile gloves, and a dust mask. For retiling, you’ll also need thinset mortar, tile spacers, grout, and a grout sealer. You can also read our guide on how to install a wall cabinet.
Can I repair the wall myself, or do I need to hire a pro?
DIY is feasible for minor damage (cracks under 1/8 inch, small holes, light adhesive residue) if you have basic tool experience. Hire a professional if you have extensive water damage, mold, large sections of crumbling drywall/plaster, or if you’re uncomfortable using power tools like drywall saws. You can also read our guide on how to decorate kitchen wall tiles.
Will the repaired wall look as good as new?
Yes, as long as you take your time with surface prep, patching, and sanding. Fully sanded patched areas are invisible under paint or tile, and a high-quality primer will block any old stains or discoloration from showing through your final finish. You can also read our guide on how to take off wall tiles in kitchen.
Conclusion
Repairing your kitchen wall after tile removal is a manageable DIY project that delivers professional results with minimal cost, as long as you follow the steps in order: assess for hidden damage, thoroughly prep the surface, patch and sand all imperfections, prime, then finish with paint or new tile. Taking the time to address moisture issues and use the right products for your wall type will ensure your repair lasts for years, without peeling, cracking, or mold growth. If you’re planning a full kitchen refresh after your wall repair, check out our guide to coordinating wall and cabinet colors for a cohesive, stylish space. You can also read our guide on how to prepare kitchen walls for painting.