How to Install Ceramic Tile in Kitchen Wall: Easy Step-by-Step Guide
A ceramic tile kitchen wall — whether a small backsplash behind the stove or a full accent wall — is one of the highest-return DIY upgrades you can tackle. It resists kitchen grease, heat, and splatters, adds timeless style, and holds up to heavy daily use far better than painted drywall. For first-time DIYers, the process may feel intimidating, but with proper prep, the right tools, and attention to detail, you can get a professional, long-lasting result without hiring a contractor. This guide walks you through every step, from wall prep to sealing, plus pro tips to avoid common mistakes like peeling tiles and cracked grout. You can also read our guide on how to prepare kitchen walls for painting.
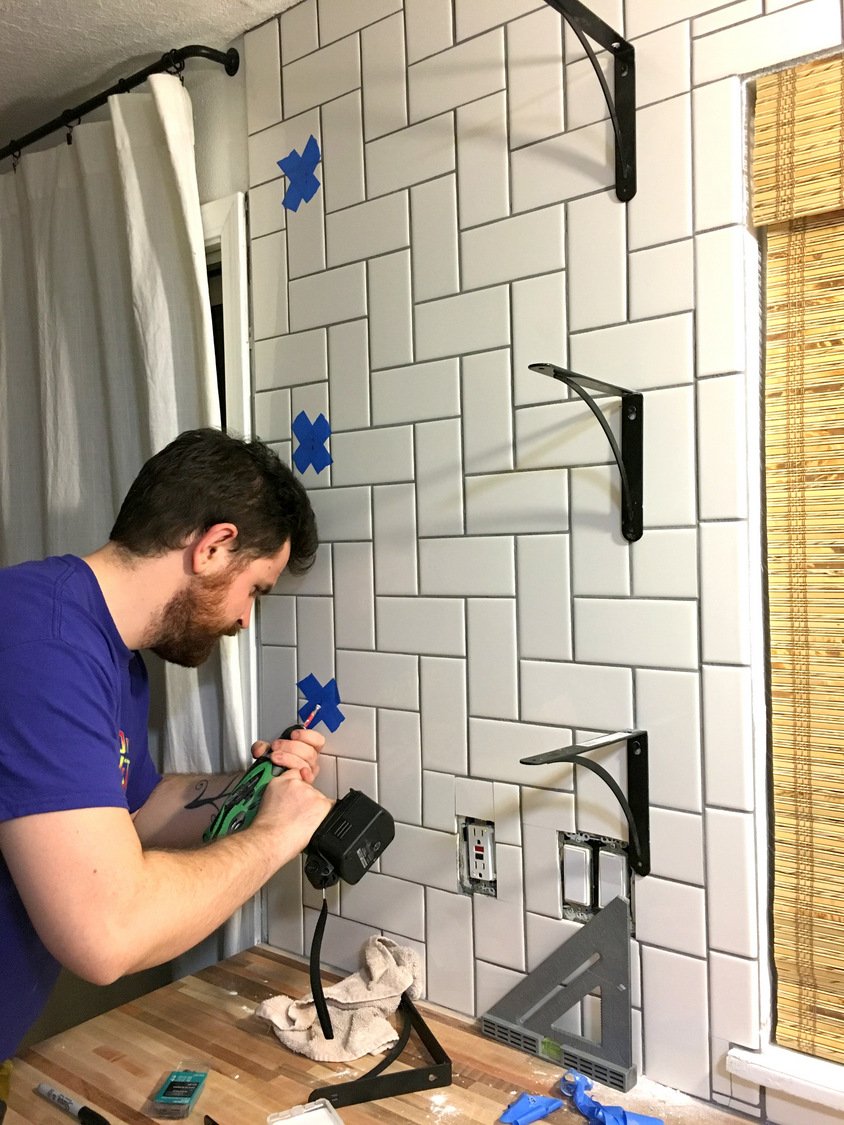
 This classic subway tile backsplash is a beginner-friendly project that adds significant resale value
Pre-Installation Planning & Wall Prep
The vast majority of tile adhesion failures trace back to skipped or rushed prep work, so don’t rush this foundational step even if your wall looks clean and flat. You can also read our guide on how do you hang kitchen wall cabinets.
Assess Your Wall Suitability
First, identify what type of wall you’re working with, as this determines what prep steps you need:
- Moisture-resistant drywall (green board): Suitable for backsplashes outside of direct splash zones (not behind a sink or dishwasher). Avoid standard drywall in kitchen areas, as it absorbs moisture and will degrade over time.
- Plaster: Works well for tile installation if it’s fully cured, flat, and free of loose material.
- Cement board: The gold standard for high-moisture areas like behind sinks, stoves, and dishwashers, as it’s completely water-resistant and provides a sturdy base for tile. If your tile layout extends behind a wall-mounted faucet, start by safe faucet removal to avoid damage during installation. If your wall has noticeable dips, bumps, or cracks, address uneven wall surfaces before laying tile to prevent hollow spots and cracked tiles down the line. You can also read our guide on how to clean kitchen walls grease.
Clean and Repair the Wall Surface
Start by removing all grease, dirt, old wallpaper, and loose paint from the wall. For kitchen walls with heavy cooking grease buildup, use a dedicated degreaser rather than mild soap and water to ensure all residue is removed. Rinse the wall with clean water, then let it dry fully for at least 24 hours (use a fan to speed up drying if needed). You can also read our guide on how to install kitchen cabinets on uneven walls. Next, fill any holes, cracks, or gouges with setting-type joint compound (not regular spackle, which is not durable enough for kitchen environments). Sand the patched areas smooth once dry, then wipe away all dust with a tack cloth to ensure adhesive bonds properly to the surface. You can also read our guide on how to remove kitchen wall tile.
Plan Your Tile Layout
Accurate layout planning prevents awkward thin cuts at the edges of your wall and ensures a balanced, professional look:
- Measure the full width and height of the installation area with a tape measure, and calculate how many tiles you’ll need. Add 10% extra to your total to account for cutting waste and breakage.
- Mark the exact center of the wall with a pencil, then use a level to draw a vertical and horizontal chalk line intersecting at that center point. This is your starting guide for tile placement.
- Do a dry fit: lay your tiles out on the floor with spacers to visualize the layout. If the cut tiles at the outer edges would be narrower than 1/4 of a full tile, adjust your starting chalk line by half a tile width to avoid thin, uneven slivers.
- Mark the locations of all outlets, switches, and fixtures on the wall with painter’s tape so you can cut tiles to fit around them later. If your layout extends under upper cabinets, account for wall cabinet mounting requirements to avoid cutting tiles that will be hidden behind cabinet brackets.
Gather Your Tools and Materials
Having all your tools on hand before you start will keep your project running smoothly and avoid last-minute trips to the hardware store. You’ll need:
- Tape measure, spirit level, and chalk line
- Setting-type joint compound, sandpaper, and tack cloth for wall prep
- Degreaser (for kitchen walls)
- Polymer-modified thin-set mortar and mixing bucket
- Notched trowel (size matched to your tile)
- Ceramic tiles (plus 10% extra for waste)
- Tile cutter or wet saw, tile nippers
- Plastic tile spacers
- Rubber grout float and sponge
- Grout (acrylic-modified or epoxy for kitchens)
- Grout sealer and applicator brush
- Safety glasses, cut-resistant gloves, N95 dust mask
- Painter’s tape and silicone caulk
Choose Tiles and Adhesives Built for Kitchen Use
Selecting the right materials for your kitchen’s unique environment (heat, moisture, grease) ensures your installation lasts for decades without staining or peeling. You can also read our guide on how to remove kitchen cabinets without damaging wall.
Pick the Right Ceramic Tiles
Not all ceramic tiles are suitable for wall installation:
- Choose tiles specifically labeled for wall use, not floor tile. Floor tile is thicker and has a higher friction rating designed for horizontal weight, so it will slide out of place before adhesive sets when installed vertically.
- Glazed ceramic tile is the best choice for kitchens, as its non-porous surface resists stains, grease, and water, and is easy to wipe clean. Unglazed ceramic tile absorbs moisture and stains easily, so it’s better suited for low-moisture areas.
- Size matters: small mosaic tiles (1×1 inch to 2×2 inch) work well for accent areas or intricate patterns, while standard 3×6 inch subway tiles are a classic, beginner-friendly backsplash choice. Large format tiles (12×24 inch and larger) cover space faster but require extra attention to leveling to avoid lippage.
- For design inspiration, check out our guides to green cabinet pairings and best tile shades to find tile colors that complement your existing cabinetry. You can also browse our roundup of decorative kitchen tile options for unique pattern and texture ideas. If you’re matching your tile to an existing 16-piece dinnerware set for casual dining, choose a tile shade that complements your dishware for a cohesive look.
Select Adhesive and Waterproofing
Thin-set mortar is the industry standard adhesive for ceramic tile installation: it’s a mix of cement, sand, and polymer additives that creates a strong, flexible bond that resists moisture and movement. You can also read our guide on how to clean kitchen wall tiles and grout.
- For most kitchen applications, use a polymer-modified thin-set for extra adhesion and crack resistance. This formula is also rated for outdoor projects like a tile-top outdoor dining table, so it’s flexible enough to handle minor wall movement in kitchens too.
- If you’re installing tile in a high-splash area (behind a sink, dishwasher, or stove), apply a liquid waterproofing membrane (such as RedGard) to the entire wall before spreading thin-set to prevent water from seeping behind tiles and causing mold or rot.
- Avoid regular construction adhesive, glue, or mastic for kitchen walls: these products are not rated for moisture exposure and will fail over time, causing tiles to peel off. Mix thin-set according to the manufacturer’s instructions: add powder to cold water (never the reverse) and mix to a smooth, peanut butter consistency. Let the mix slake (rest) for 10 minutes, then stir again to remove lumps. Only mix as much thin-set as you can use in 30 minutes, as it will start to set quickly. For official best practices on tile installation, refer to industry-standard installation guidelines from the Tile Council of North America. You can also read our guide on how to take off wall tiles in kitchen.
Cut Tiles to Fit Your Layout
Precise cuts are key to a polished, professional finish, especially around outlets, switches, and wall edges.
Measure and Mark Cuts Precisely
Use a tape measure to mark the exact size of the cut on the tile with a permanent marker (pencil marks can rub off during cutting). For cuts around outlets and switches, hold a piece of cardboard up to the fixture, trace the outline, then transfer that shape to the tile to ensure a perfect fit. Always double-check your measurements before cutting — the golden rule of tile installation is "measure twice, cut once" to avoid wasting materials. You can also read our guide on how to stop kitchen cabinet door from hitting wall.
Cut Tiles Safely and Accurately
Choose the right tool for your cut type:
- Manual tile cutters: Best for straight cuts on small format tiles (subway, mosaic). Score the tile firmly along your marked line with the carbide wheel in one smooth pass, then press down on the handle to snap the tile along the score line.
- Wet saw: Ideal for large format tiles or repeated straight cuts. The water-cooled blade reduces dust and prevents chipping; feed the tile slowly for the cleanest cut.
- Tile nippers: Use these for curved or irregular cuts around fixtures. For safety, wear cut-resistant gloves, safety glasses, and a N95 dust mask when cutting tile. Clean up tile dust and shards immediately to avoid slip hazards. For more guidance on safe power tool use, review OSHA’s detailed safety guidance for DIY projects. If you need to remove old kitchen wall tile before installing new, our step-by-step guide to removing old kitchen wall tile will help you avoid damaging your walls. You can also read our guide on www yoursite com what height are kitchen wall.
Apply Adhesive and Set Tiles
Proper adhesive application and tile placement ensure your installation stays flat and secure for decades.
Spread Thin-Set Evenly
Choose a notched trowel size that matches your tile: a 1/4×1/4 inch square notch trowel works for tiles smaller than 8×8 inches, while a 1/4×1/2 inch notch is better for larger format tiles. Spread thin-set in a 2×2 foot section at a time to prevent it from drying out before you set the tile. You can also read our guide on best cloth napkins for everyday use. Hold the trowel at a 45-degree angle to spread a thin, even layer of thin-set on the wall, then comb it with the notched edge to create uniform ridges. These ridges ensure full contact between the tile and adhesive, eliminating hollow spots that cause tiles to pop off later — a common mistake for first-time DIYers is spreading thin-set too thin, which leads to poor adhesion. You can also read our guide on how long does it take to tile a kitchen wall.
Place and Align Tiles Correctly
Press each tile firmly into the thin-set, twisting it slightly 1/8 inch to push the adhesive into the tile’s ridges. Use a spirit level to check that each tile sits flat against the wall, with no lippage (where one tile is higher than its neighbor). Start at the center chalk line you marked earlier, working outwards to the edges to keep your layout balanced. You can also read our guide on tiles design for kitchen wall.
 In-progress tiling showing adhesive application and tile alignment
Use Spacers for Consistent Grout Lines
Insert 1/8 inch plastic spacers between each tile at the corners and along the edges as you work. For mosaic tiles with tight patterns, use 1/16 inch spacers to create thinner, more seamless grout lines. Spacers keep your grout joints uniform, which makes the grouting step faster and gives your installation a professional, finished look. Leave spacers in place for 1-2 hours, until the thin-set is firm enough to hold the tiles in place, then remove them before the adhesive hardens fully. You can also read our guide on best heat resistant oven mitts.
 Tile spacers ensure consistent grout lines for a professional finish
Grout Your Tile Installation
Grout fills the gaps between tiles, locks them in place, and creates a watertight seal that prevents dirt and moisture from getting behind the tile surface. You can also read our guide on how to fix wall tiles in kitchen.
Choose the Right Grout
Not all grout is created equal for kitchen use:
- Unsanded grout: Best for grout lines narrower than 1/8 inch (common for mosaic tiles), as sanded grout will be too abrasive and may scratch delicate tile surfaces.
- Sanded grout: Ideal for grout lines 1/8 inch and wider, as the sand additive adds durability and resists cracking over time.
- Epoxy or acrylic-modified grout: The best choice for kitchens, as it’s highly stain-resistant and repels water, making it easy to clean up grease and food splatters. Regular cement grout is affordable but stains easily, so it requires frequent sealing.
Mix and Apply Grout
Mix your grout according to the manufacturer’s instructions, adding grout powder to water (not the reverse) and stirring to a smooth, lump-free consistency. Let the mix slake for 10 minutes, then stir again before use. You can also read our guide on wall tiles design for kitchen. Use a rubber grout float to press grout into the joints at a 45-degree angle, working in 3×3 foot sections to prevent the grout from drying out before you can clean it. Make sure all joints are fully packed with grout, with no gaps or voids. You can also read our guide on how to retile a kitchen wall.
Clean Excess Grout and Cure Properly
Wait 15-20 minutes after applying grout, then wipe the tile surface with a damp sponge, rinsing the sponge frequently to avoid smearing grout on the tile face. Don’t scrub too hard, or you’ll remove grout from the joints. After the initial wipe, use a soft, dry cloth to buff off any remaining grout haze. You can also read our guide on how to decorate kitchen wall tiles. Let the grout cure fully for 72 hours (per Tile Council of North America standards) before exposing it to water, steam, or heavy use. Rushing this step is a common cause of cracked, crumbly grout. You can also read our guide on what paint is good for kitchen walls.
Seal Grout and Complete Finishing Touches
Proper sealing protects your grout from stains and extends the life of your installation by years.
Apply Grout Sealer
Note that glazed ceramic tile is non-porous and does not require sealer — only unglazed tile and all grout lines need protection. Use a penetrating grout sealer, which soaks into the grout to create a waterproof barrier against grease, wine, and food splatters. You can also read our guide on piece dinnerware set service for. Apply sealer with a small foam brush or applicator, working it directly into the grout lines. Wipe off any excess sealer from the tile surface with a clean cloth to avoid residue. Apply 2-3 thin coats, letting each coat dry fully per the product instructions (usually 1-2 hours between coats). You can also read our guide on how to decorate small kitchen walls.
Reinstall Fixtures and Final Inspection
Once the sealer is fully cured (24 hours), reinstall any fixtures you removed during installation: outlet covers, switch plates, faucets, and cabinet hardware. If you need to adjust cabinet doors that are hitting your new tile backsplash, our guide to cabinet door alignment adjustments will help you fix the issue quickly. Apply a thin bead of 100% silicone caulk to seal cabinet-to-wall gaps and between the tile and countertop to create a watertight seal and prevent moisture from seeping behind the tile. You can also read our guide on how to clean kitchen wall tiles easily. Inspect the entire installation for any chipped tiles, uneven grout lines, or missed spots. Touch up grout or sealer as needed, and buff the tile surface with a soft, non-abrasive cloth to remove any final haze. You can also read our guide on tile designs for kitchen floors.
Common Installation Mistakes to Avoid
Even experienced DIYers run into these avoidable errors:
- Skipping wall prep: Loose paint, grease, or uneven walls will cause tiles to peel off within months.
- Not using spacers: Uneven grout lines not only look unprofessional, but also create weak joints that crack over time.
- Spreading thin-set too far in advance: Thin-set starts to set after 30 minutes, so spreading more than you can tile in that window will lead to poor adhesion.
- Grouting before thin-set is fully cured: Moving tiles or applying weight to them before the 24-hour thin-set cure time will cause shifting and cracked grout.
- Skipping grout sealer: Unsealed grout will stain and grow mold within 1-2 years in a high-moisture kitchen environment.
Frequently Asked Questions
How long does it take to install ceramic tile on a kitchen wall?
For a standard 30-square-foot backsplash, a novice DIYer can expect to spend 4-6 hours on active installation, plus 24-72 hours of curing time for thin-set and grout before the area is ready for regular use. For a more detailed breakdown, check our guide to the typical tiling timeline for kitchen projects. You can also read our guide on tile designs for kitchen countertops.
Do I need to remove existing tile before installing new ceramic tile?
You can install new tile over existing ceramic tile if the old tile is fully adhered, flat, and free of damage, but you must roughen the old tile surface with 80-grit sandpaper and apply a tile bonding primer first. For best results, especially if the old tile is loose or uneven, remove it entirely to avoid thickness issues with outlets and countertop edges. Follow our safe old tile removal tips to avoid damaging your walls during the process. You can also read our guide on tile top outdoor dining table.
Can I install ceramic tile on a painted drywall?
Only if the paint is fully cured, not glossy, and you apply a waterproofing membrane to the entire wall first. Regular unpainted drywall is not recommended for kitchen areas, as it absorbs moisture and will degrade over time. For areas behind sinks or dishwashers, use cement board as a base instead. If you’re painting your walls before tiling, follow our pre-paint wall cleaning steps to ensure paint adheres properly and doesn’t peel under tile adhesive. You can also read our guide on what color should kitchen walls be.
How do I keep tile from sliding while the thin-set sets?
Use small pieces of blue painter’s tape to hold tiles in place for the first 1-2 hours after setting, especially for large format tiles or vertical walls. Remove the tape before it bonds to the tile surface to avoid residue. You can also read our guide on how to put tile on wall in kitchen.
What grout color should I use for a kitchen backsplash?
Neutral grout shades (white, light gray, beige) are the most versatile and hide stains and splatters far better than dark grout. For a contrasting, intentional look, choose a grout color that complements your tile and cabinet finish. You can also read our guide on how to clean kitchen walls for painting.
Final Thoughts
Installing ceramic tile on your kitchen wall is a rewarding, low-cost DIY project that adds style, durability, and resale value to your home for decades. By prioritizing wall prep, choosing the right materials for your kitchen’s environment, and following proper curing times, you can avoid the most common pitfalls and get a professional-looking result without the cost of hiring a contractor. If you’re also planning to repaint your kitchen, our guide to complementary wall paint colors will help you choose a shade that works with your new tile, and our tips for durable kitchen paint options ensure your painted walls hold up to daily messes. For areas not covered by tile, use a soft, non-abrasive cloth, the same type recommended for everyday napkins, to wipe up grease and splatters without damaging surfaces. You can also read our guide on how to remove kitchen tiles from wall.
Ready to start your kitchen refresh? Bookmark this guide to reference throughout your installation, and explore our full library of DIY home improvement resources to make your project stress-free and successful. You can also read our guide on how to install a wall cabinet.