
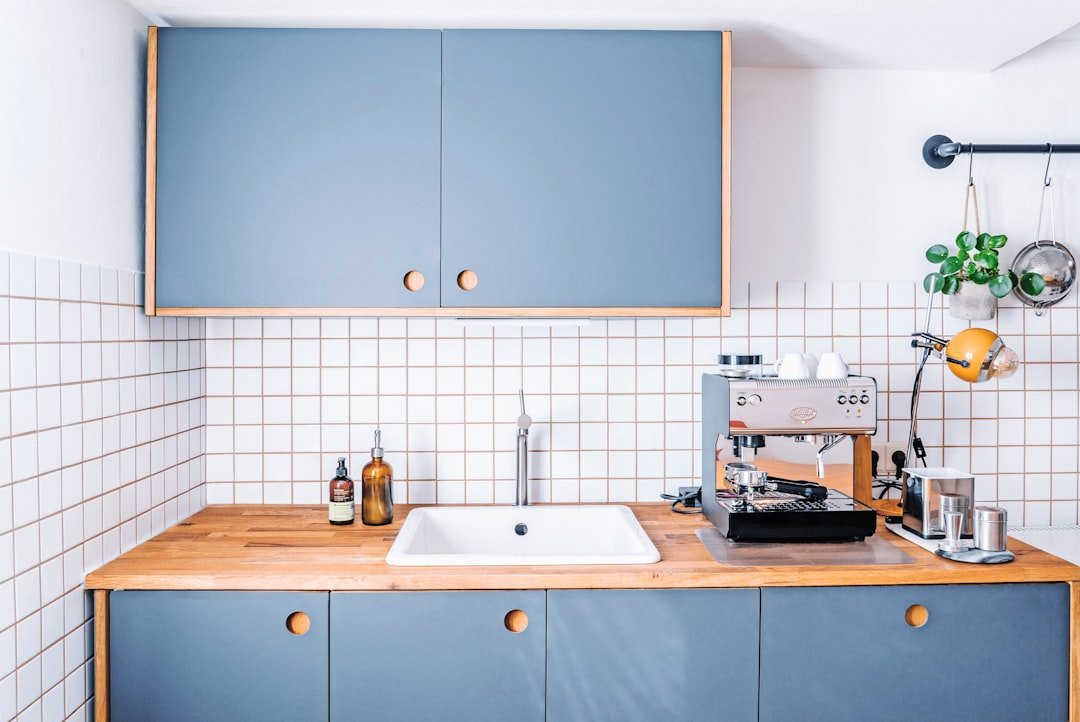
How to Install Wall Mounted Kitchen Cabinets: Expert Guide
Wall-mounted kitchen cabinets are one of the highest-ROI upgrades you can make to your kitchen: they free up floor space for storage, add vertical storage for dishware and small appliances, and create a clean, modern look that suits every design style. But a rushed or incorrect installation can lead to wobbly cabinets, damaged walls, or even safety hazards if heavy cabinets pull loose. This expert guide, built on thousands of successful DIY and professional installations, walks you through every step of the process, from pre-install planning to post-install care, with specific guidance for all common wall types and 2026 best practices. You can also read our guide on red kitchen walls what color cabinets.
Pre-Installation Planning & Preparation
Skipping pre-install checks is the most common cause of botched cabinet installations. Taking 30 minutes to plan ahead will save you hours of rework and prevent costly mistakes. You can also read our guide on how to install ikea kitchen cabinets on wall.
Tools & Materials You’ll Actually Need
Gather all supplies before you start to avoid mid-project trips to the hardware store. For most standard drywall or plaster wall installations, you will need:
- Stud finder: A magnetic or electronic stud finder works best; avoid older magnetic-only models that can miss metal studs or pipes behind drywall.
- Laser level: Cuts layout time in half for long cabinet runs and ensures perfectly straight horizontal lines.
- Cordless drill with 1/8" and 3/16" drill bits: For pilot holes and driving screws.
- Tape measure and carpenter’s square: For precise, square measurements.
- 2.5"-3" wood screws (for stud mounting) and toggle bolts/Molly bolts (for drywall without studs, only for lightweight cabinets under 20 lbs).
- Shims (wood or plastic): To fill gaps behind cabinets on uneven walls.
- Construction adhesive and paintable caulk: For extra hold and a clean finished look.
- Clamps: To hold cabinets in place while drilling and connecting them.
- Safety gear: Safety glasses, work gloves, knee pads, and a dust mask for drilling.
If you’re installing cabinets on brick, concrete, or plaster walls, you will also need masonry drill bits and concrete anchors rated for the weight of your cabinets. You can also read our guide on how tall are kitchen wall cabinets.
Assess Your Wall Type & Load Capacity
Wall cabinets typically hold 25-50 lbs of weight when fully loaded with dishware, so your mounting method must match your wall type:
- Drywall (most common): Always screw into wall studs (16" or 24" on center) for full weight support. Drywall alone can only hold 10-15 lbs with anchors, which is insufficient for most cabinet loads.
- Plaster walls: Studs are typically 16" on center, but plaster is more brittle than drywall; use smaller pilot holes to avoid cracking.
- Brick/concrete: Use masonry anchors and a hammer drill to secure cabinets directly to the masonry, no studs required.
- Mounting boards: If your cabinet layout does not align with existing studs, install a 1×4 pressure-treated mounting board anchored to 2-3 studs first, then mount cabinets to the board for full support.
A common mistake DIYers make is skipping the stud check and relying solely on drywall anchors, which leads to cabinets pulling loose over time, especially when loaded with heavy cookware. You can also read our guide on grey kitchen cabinets what colour walls.
Pre-Install Wall Checks
Before you mark any measurements, inspect your wall for hidden hazards:
- Use a non-contact voltage tester to check for electrical wires behind drywall, especially near outlets and light switches. If you find wires running through the area where you plan to mount cabinets, turn off the relevant circuit at your breaker box before drilling.
- Check for plumbing pipes or vent ducts behind the wall using a small drill bit to test a hidden hole in an inconspicuous area. If you find an obstruction, adjust your cabinet layout to avoid it.
- If you’re updating an existing kitchen, start by removing existing wall fixtures like faucets or old cabinet hardware to avoid interference during installation.
- Clean the wall surface with a degreaser to remove dust, grease, and debris, which will help adhesive and caulk bond properly.
Step-by-Step Cabinet Installation
Follow these steps in order for a secure, level installation that looks professional.
Step 1: Mark Your Layout & Stud Locations
Standard upper wall cabinets are installed 54" from the floor to the bottom of the cabinet, but adjust this height to match your preferred ergonomics (most people prefer the bottom of the cabinet 18-24" above the countertop for easy reach). You can also read our guide on how to hang kitchen cabinets on wall.
- Use a laser level to draw a perfectly straight horizontal line along the wall where the bottom of your upper cabinets will sit.
- Run a stud finder along the line to locate all wall studs, marking the center of each stud with a pencil.
- Mark the vertical edges of your cabinet run on the wall, and mark the mounting hole locations for each cabinet, aligning them with the stud centers you marked.
- Double-check all measurements with a helper to avoid errors—measure twice, mark once.
 Accurate stud marking ensures wall-mounted cabinets can support the full load of dishware and cookware.
Step 2: Prep & Assemble Cabinets
Unpack all cabinet components and inspect for damage before assembly. Lay parts on a soft surface to avoid scratching finishes. You can also read our guide on teak wood outdoor dining table.
- Assemble cabinet boxes per the manufacturer’s instructions, using cam locks or screws as directed. Ensure all corners are square and the box is not warped.
- Install adjustable shelves and any mounting brackets or hanging rails included with your cabinets.
- If your cabinets have a separate back panel, attach it now to reinforce the box and provide a solid mounting surface.
- Test all cabinet doors to ensure they open and close smoothly before mounting; adjust hinges if needed now to avoid rework later.
Step 3: Mount the First Cabinet
The first cabinet sets the alignment for the entire run, so take extra care to get it level.
- With a helper, lift the first cabinet and align its top edge with your marked horizontal line. Place a level on top of the cabinet to confirm it is perfectly horizontal.
- Use a pencil to mark the mounting hole locations through the cabinet back or mounting brackets onto the wall.
- Remove the cabinet and drill 1/8" pilot holes at each mark, driving the bit 2" deep into the studs.
- Apply a small bead of construction adhesive to the back of the cabinet for extra hold (this is especially useful for plaster walls, which can be brittle).
- Lift the cabinet back into place, align it with your marks, and drive 2.5"-3" wood screws through the mounting holes into the studs. Do not over-tighten, as this can strip the screw holes or warp the cabinet back.
- Check the level again, and adjust with shims behind the cabinet if needed. Trim excess shim with a utility knife once the cabinet is secure.
 Pilot holes drilled 1/8" smaller than the screw diameter prevent wall splitting and ensure screws grip securely into wood studs.
Step 4: Align & Connect Additional Cabinets
- Place the next cabinet next to the first, aligning its front edge flush with the first cabinet’s front edge. Use a 1/4" spacer between cabinets if your design calls for a gap.
- Clamp the two cabinets together at the front to hold them in place.
- Drill screws through the side of the first cabinet into the side of the next cabinet to connect them, using 1" wood screws. Ensure the connection is tight and the cabinets remain level.
- Repeat this process for all remaining cabinets in the run, checking level and flush alignment after each cabinet is installed.
Step 5: Secure & Finish the Mount
- Drive additional screws through the back of each cabinet into any remaining studs for extra support.
- Fill any gaps between the cabinet and wall with paint-ready caulk, using painter’s tape along the cabinet edges to create a clean, straight line. Smooth the caulk with a wet finger or caulk tool for a professional finish.
- Attach any crown molding, trim, or light rail trim included with your cabinets per the manufacturer’s instructions.
Post-Installation Adjustments & Styling
The final steps ensure your cabinets function perfectly and look polished.
Adjust Cabinet Doors & Hardware
- Install cabinet hinges first, aligning them with the pre-drilled holes in the cabinet doors. Most modern adjustable hinges have three axes of adjustment: up/down, left/right, and in/out. Loosen the adjustment screws slightly to shift the door until it sits flush with the cabinet frame and closes evenly without gaps.
- Install handles or knobs using a template to ensure even spacing between each piece of hardware. Choose hardware that matches your kitchen’s existing finish (brushed nickel, matte black, brass, etc.) for a cohesive look.
- Test every door 3-4 times to confirm no sticking or rubbing; make small adjustments as needed before moving on.
Final Inspection & Load Testing
Before loading your cabinets with dishware, complete these checks:
- Tug on each cabinet firmly to confirm it is securely mounted to the wall, with no wobble or movement.
- Check that all mounting screws are tight, and re-tighten any that have loosened during installation.
- Load each cabinet with 10-15 lbs of lightweight dishware first, and wait 24 hours before loading to full capacity to allow adhesive and screws to set fully.
Style Your New Cabinets
Once your cabinets are installed, you can tie the whole kitchen together with complementary design choices. For bold green cabinet finishes, pairing wall colors with green cabinetry in soft neutrals or muted earth tones will make the space feel bright and balanced. If you opted for warm wood or brown cabinet finishes, coordinate paint with brown cabinets in warm whites, creams, or soft grays to highlight the natural grain of the wood. You can also read our guide on how to build a half wall in kitchen.
 A level ensures cabinets are perfectly horizontal to avoid sagging or misaligned doors.
Common Installation Issues & Fixes
Even experienced DIYers run into snags during cabinet installation. Here are the most common issues and how to fix them quickly:
Uneven or Misaligned Cabinets
If your cabinets are not level or flush after installation, loosen the mounting screws slightly, add or adjust shims behind the cabinet to fill gaps, and re-tighten the screws. Check level across the front edges of all cabinets in the run, and make small adjustments as needed. For large gaps between the cabinet and wall, you may need to reposition the cabinet slightly to align with a stud. You can also read our guide on how high are wall cabinets in kitchen.
Loose or Wobbly Cabinets
Loose cabinets are a serious safety hazard. First, check if the screw holes in the studs are stripped: if they are, fill the hole with a wooden dowel coated in wood glue, let it dry for 2 hours, then drill a new pilot hole and re-secure the screw. If you are mounting to drywall without studs, replace standard plastic anchors with toggle bolts or Molly bolts, which have a higher weight capacity. If you missed studs entirely, remove the cabinet, install a 1×4 mounting board anchored to 2-3 studs, then mount the cabinet to the board. You can also read our guide on how to retile a kitchen wall.
Gaps Between Cabinets and Wall
Small gaps (1/8" or less) can be filled with caulk matching your cabinet or wall color. Larger gaps indicate either a warped cabinet or an uneven wall: use shims to fill the gap before caulking, or adjust the cabinet mounting position to sit flush against the wall. You can also read our guide on how to build a kitchen wall cabinet.
Scratches or Dents During Installation
Minor scratches on laminate or thermofoil cabinets can be fixed with a touch-up marker in a matching finish. Deeper dents can be filled with wood filler, sanded smooth, and touched up with paint or stain to match the cabinet finish. If a hinge is damaged during installation, replace it with a matching adjustable hinge available at most hardware stores. You can also read our guide on how to attach kitchen cabinets to a brick wall.
Maintenance for Long-Lasting Cabinets
Proper maintenance will keep your wall-mounted cabinets looking new and functioning safely for 15+ years:
- Routine cleaning: Wipe down cabinets monthly with a soft cloth and mild dish soap; avoid abrasive cleaners that can damage finishes. Clean grease buildup near the stove with a diluted degreaser, and dry surfaces immediately to prevent water damage.
- Annual inspection: Every 6 months, check all mounting screws for tightness, inspect for signs of water damage, mold, or warping, and adjust door hinges if they become misaligned over time.
- Preventative care: Install cabinet liners inside cabinets near sinks and the stove to protect against spills and heat. Avoid overloading shelves with more than 50 lbs of weight to prevent sagging, and use a range hood to reduce grease and moisture buildup in the kitchen.
For industry-standard guidelines on cabinet load capacity and installation safety, refer to the National Kitchen and Bath Association’s cabinet installation best practices. To stay safe while drilling into walls, follow OSHA’s DIY home improvement safety guidelines for tool use and hazard avoidance. You can also read our guide on top of kitchen cabinet decor.
Frequently Asked Questions
What is the standard height for wall-mounted kitchen cabinets?
The standard height for upper wall cabinets is 54" from the floor to the bottom of the cabinet, which places the bottom of the cabinet 18" above a standard 36" kitchen countertop. Adjust this height up to 24" above the counter if you are taller or prefer more clearance for small appliances. You can also read our guide on best way to pack glassware safely.
Can I install wall cabinets on drywall without hitting studs?
No. Drywall alone cannot support the weight of fully loaded wall cabinets, even with heavy-duty anchors. All cabinets must be anchored to wall studs or a mounting board secured to studs for safety. Toggle bolts can be used for lightweight cabinets under 20 lbs, but stud mounting is required for standard loads. You can also read our guide on how to install kitchen cabinets on uneven walls.
How long does it take to install wall-mounted kitchen cabinets?
For a standard 10-foot run of cabinets, installation takes 3-5 hours for an experienced DIYer, including wall prep and assembly. First-time installers should budget 6-8 hours to account for measuring, adjustments, and troubleshooting. You can also read our guide on how to install a kitchen range hood wall vent.
Do I need a mounting board for my wall cabinets?
A mounting board is only required if your cabinet layout does not align with existing wall studs, or if you are installing extremely heavy cabinets (over 75 lbs each) that require extra support. For most standard installations, direct-to-stud mounting is sufficient. You can also read our guide on what screws to use for kitchen wall cabinets.
How much weight can wall-mounted kitchen cabinets hold?
Standard wall-mounted cabinets are rated to hold 25-50 lbs per shelf when properly mounted to studs. Overloading cabinets beyond this weight can cause screws to strip or cabinets to pull loose from the wall. You can also read our guide on what size screws for kitchen wall cabinets.
Conclusion
Installing wall-mounted kitchen cabinets is a rewarding DIY project that transforms your kitchen’s function and style, as long as you prioritize planning, precision, and safety. By taking the time to locate studs, use a level for alignment, and make small adjustments during installation, you can achieve a professional-looking result that lasts for decades. Proper maintenance and annual inspections will keep your cabinets secure and looking their best for years to come. If you’re planning a full kitchen refresh, check out our guide to coordinating wall paint with your new cabinet finish for a cohesive, polished space. You can also read our guide on how deep are wall kitchen cabinets.



One Comment