What Height to Set Kitchen Wall Units: Expert Tips for Perfect Placement
Choosing the right height for your kitchen wall units is one of the most impactful decisions you’ll make during a renovation or new build, even if it feels like a small detail at first. Get it wrong, and you’ll be straining to reach your go-to mugs, bumping your head on low cabinet edges, or stuck with a disjointed, unbalanced kitchen look. Get it right, and you’ll have a space that’s comfortable for every household member, efficient for daily cooking, and visually cohesive for years to come. Below, we break down expert-backed, 2026-current guidance to help you find the perfect height for your space, no guesswork required.
Why Wall Unit Height Matters More Than You Think
Wall unit height isn’t just an aesthetic choice — it directly impacts your daily kitchen workflow, long-term comfort, and even your home’s resale value. Cabinets installed too high will require step stools for everyday items, increasing risk of trips and falls, while units installed too low will cramp your countertop workspace and create awkward clearance for pots, pans, and small appliances. For households with multiple users, kids, or mobility needs, the right height can make the difference between a kitchen that feels welcoming and one that feels frustrating to use. Standard baseline measurements exist for a reason, but the best height is always tailored to your unique space and household. For more on this, see our guide on what height should kitchen wall units be.
2026 Standard Baseline Measurements
For most North American households with users between 5'4" and 6'0" tall and standard 8-foot ceilings, the industry baseline for wall unit placement is 54 inches from the finished floor to the bottom of the cabinet, with an 18-inch gap between the countertop and the bottom of the wall unit. This measurement aligns with ergonomic guidelines from the National Kitchen and Bath Association (NKBA), the leading trade body for residential kitchen design, and positions the most frequently used items (everyday dishes, cooking staples, snacks) on the second shelf from the bottom, reachable without stretching or bending for average-height users.
Standard base cabinets plus a 1.5-inch thick countertop total 36 inches from the floor, so the 18-inch gap creates a total height of 54 inches to the bottom of the wall unit. For 9-foot or higher ceilings, you can either raise the cabinet bottom slightly or extend the full cabinet height to the ceiling with a decorative valance; for 7-foot or lower ceilings (common in older homes and apartments), lower the cabinet bottom to 50–52 inches and use shallower 12-inch deep cabinets to avoid a cramped, top-heavy look.
To tailor measurements to your household, use the reference table below:
| User Height | Recommended Wall Unit Bottom Height (from finished floor) | Countertop to Cabinet Gap |
|---|---|---|
| Under 5'4" (162 cm) | 48–52 inches (122–132 cm) | 16–17 inches (41–43 cm) |
| 5'4"–6'0" (162–183 cm) | 54 inches (137 cm) | 18 inches (46 cm) |
| Over 6'0" (183 cm) | 56–60 inches (142–152 cm) | 19–20 inches (48–51 cm) |
Adjusting Height for Your Kitchen's Unique Variables
The standard 54-inch baseline is a starting point, not a hard rule. Several key factors will require you to adjust this height to fit your space, layout, and needs.
Ceiling Height Adjustments
For 9-foot ceilings, raising the wall unit bottom to 56–58 inches and adding a matching bulkhead between the top of the cabinet and the ceiling creates a sleek, built-in look that avoids wasted vertical space. If you prefer to keep the standard 54-inch height, extend the cabinet box to the ceiling and add a decorative valance or open shelving to the top for extra storage and visual interest. For 7-foot or lower ceilings, lowering the cabinet bottom to 50–52 inches prevents the space from feeling tight, and using 12-inch deep cabinets instead of standard 14-inch models adds an extra 2 inches of headroom when standing at the counter.
Countertop Height Customization
If you’ve opted for a non-standard countertop height, adjust your wall unit placement to maintain a consistent, comfortable gap. Raised breakfast bars are typically 42 inches tall, so if you’re installing wall units above a bar, lower the cabinet bottom to keep the 18-inch gap for seated users. For accessible kitchens designed for wheelchair users, the ADA Standards for Accessible Design recommend a maximum wall cabinet bottom height of 48 inches from the floor, with a 17-inch minimum gap to the countertop to ensure items are reachable from a seated position. If you’re using a thicker countertop material (like 4cm quartz vs standard 2cm laminate), subtract the countertop thickness from your gap measurement to avoid ending up with a smaller clearance than intended.
Appliance Integration Requirements
If you’re installing appliances inside your wall units, account for manufacturer ventilation and clearance requirements when setting your height. For over-the-range microwaves, leave 2–4 inches of clearance above the appliance for heat dissipation, per most brand specs. Built-in wall ovens require custom cabinet sizing that matches the oven’s exact dimensions, with a 1/4-inch gap on each side for expansion as the appliance heats and cools. For chimney-style range hoods that extend to the ceiling, align the bottom of adjacent wall units with the bottom of the hood’s canopy for a cohesive look, or leave 2–3 inches of clearance to create a layered, modern effect. Always leave 1–2 inches of space above the wall unit if you plan to install under-cabinet LED lighting, to avoid the lights being blocked by cabinet doors.
Layout-Specific Tweaks
Your kitchen’s layout will also impact ideal wall unit height. For galley kitchens, stick to the standard 18-inch gap to avoid feeling cramped when two people cook side by side. For L-shaped or U-shaped kitchens, you can lower the wall units above the sink or cooktop by 2–3 inches, as these are the spots you’ll stand in front of most often, bringing frequently used items (spices, pots, dish soap) within easier reach. For open-plan kitchens that adjoin a dining or living area, raise the wall unit bottom by 1–2 inches to avoid blocking sightlines to decorative countertop items (like a fruit bowl or coffee maker) from adjacent rooms.
Ergonomics and Accessibility Best Practices
The right wall unit height eliminates daily strain and makes your kitchen usable for every member of your household, regardless of age or ability.
Optimizing for Your Household's Reach Range
The most frequently used items in your wall cabinets should be stored on the second shelf from the bottom, reachable without a step stool for the shortest adult in your household. For homes with young kids, install a lower set of adjustable wall units at 36–42 inches from the floor for their snacks, dishes, and school supplies to encourage independence. For taller households with an average height over 6'2", consider installing wall units with pull-down shelves for the upper cabinets, so you don’t have to strain to reach items stored at the top of the unit. In practice, a common mistake we see in residential installs is setting the height to suit the person doing the installation, rather than the person who does most of the cooking — have all regular kitchen users test a mock-up of the planned height (use a piece of painter's tape on the wall at the planned bottom of the cabinet) before finalizing placement.
Reducing Strain and Injury Risk
Repeatedly reaching overhead or bending low to access wall cabinets can lead to chronic shoulder, back, or neck strain over time, especially for people who cook multiple meals a week. If you have existing mobility issues or chronic pain, lower your wall units by 2–3 inches to reduce overhead reaching. For households with older adults, keep the bottom of the wall cabinet no higher than 52 inches to avoid requiring a step stool, which is a leading cause of kitchen-related falls.
Achieving Aesthetic Balance and Design Cohesion
Once you’ve nailed the functional height, you can fine-tune the placement to create a polished, proportional look that fits your kitchen’s style.
Visual Proportion to Core Kitchen Elements
For a seamless, professional look, align the front face of your wall units flush with the front face of your base cabinets — even a 1/4-inch offset will be obvious and make the kitchen feel unfinished. If you have a tiled backsplash, leave 1–2 inches of clearance between the bottom of the wall unit and the top of the backsplash to avoid water damage from cooking splashes, a common oversight in many 2026 kitchen installs. Pairing your new wall units with the right wall paint is the easiest way to tie the whole kitchen together — if you’ve opted for green cabinetry, our guide to coordinating wall paint will help you pick a shade that feels fresh, not overwhelming. For warm brown cabinet tones, our tips for matching wall finishes will help you avoid a dated, mismatched look that clashes with your hardware and countertops.
Style-Specific Height Trends
Different kitchen styles call for slightly different height approaches to hit the right aesthetic note. For modern, minimalist kitchens, floor-to-ceiling wall units with no gap above the cabinet are a popular 2026 trend, as they hide clutter and make the space feel larger. For traditional or cottage-style kitchens, leaving a 6–12 inch gap between the top of the wall unit and the ceiling, filled with a decorative valance or open shelving, adds warmth and charm. For industrial-style kitchens, leaving the space above the wall units open to expose brick, ductwork, or wooden beams is a common choice, so you can stick to the standard 54-inch height without extending cabinets to the ceiling.
Step-by-Step Installation Guide for Accurate Placement
Even with the perfect planned height, a sloppy install will leave you with crooked doors and misaligned cabinets. Follow these steps for a professional-grade result:
- Measure from the finished floor: Mark your target height (54 inches, or your adjusted measurement) from the finished floor, not the subfloor, to account for any tile, vinyl, or hardwood flooring you’re installing. Use a 4-foot spirit level or laser level to draw a perfectly straight line across the entire run of cabinets.
- Locate wall studs: Use an electronic stud finder to mark the position of all wall studs along your level line. Wall units should be anchored directly into studs, not just drywall anchors, to support the weight of dishes, appliances, and cabinet contents (standard wall units weigh 30–50 lbs each, plus contents).
- Check for obstructions: Scan for electrical outlets, light switches, vent hoods, or plumbing pipes that run through the wall where you’re installing cabinets. Adjust your height by 1–2 inches if needed, or plan to add a custom filler panel to cover the obstruction.
- Install a temporary ledger board: Screw a 1×4 board along your marked level line, anchored into studs, to rest the bottom of the wall cabinets on while you secure them. This prevents the cabinets from shifting while you drill screws into the studs.
- Secure and level each cabinet: Place each cabinet on the ledger board, use clamps to align it with adjacent cabinets, then drive 2.5–3 inch wood screws through the cabinet’s hanging rail into the studs. Check the level of each cabinet front with a spirit level as you go, adjusting with shims behind the cabinet if needed to create a flush, even surface.
- Finish and seal: Once all cabinets are secured, remove the ledger board, fill any gaps between cabinets and the wall with waterproof caulk, and install trim or filler panels as needed to create a seamless finish. If you’re updating your kitchen’s plumbing as part of your renovation, our step-by-step guide to prepping your plumbing will walk you through removing an old wall-mounted faucet without damaging your walls or cabinets.
Common Mistakes to Avoid
Even experienced DIYers run into these avoidable errors when installing wall units:
- Sticking rigidly to the standard 54-inch height without adjusting for your household: The baseline is calibrated for average users, but if the shortest person in your home is under 5'4" or the tallest is over 6'0", adjust the height by 2–4 inches to reduce strain. Have all regular users test the planned height with painter's tape before finalizing placement.
- Forgetting to account for flooring thickness: If you install cabinets before laying new flooring, the finished floor will be 1/2–3/4 inch higher than the subfloor, making your cabinets sit lower than planned. Always measure from the finished floor height, or install cabinets after flooring is laid for the most accurate placement.
- Blocking under-cabinet lighting or ventilation: Leave at least 1 inch of clearance between the bottom of the wall cabinet and the countertop if you’re installing under-cabinet LED strips, and 2–4 inches above microwaves installed in the wall unit for proper ventilation.
- Misaligning wall and base cabinets: Even a small offset between the front face of wall and base units will be obvious and make your kitchen look unpolished. Use a long level to check alignment between the top of the base cabinets and the bottom of the wall units before securing the upper cabinets.
Frequently Asked Questions
What is the ideal height for kitchen wall units for most households?
For households with users between 5'4" and 6'0" tall, the ideal height is 54 inches from the finished floor to the bottom of the wall cabinet, with an 18-inch gap between the countertop and the cabinet. This aligns with NKBA ergonomic guidelines and works for standard 8-foot ceilings and 36-inch countertops.
How far should wall units be from the countertop?
The standard gap is 18 inches, but you can adjust this to 16–17 inches for shorter users, or 19–20 inches for taller users, to reduce reaching or bending. If you’re installing a microwave in the wall unit, leave an extra 2–4 inches of clearance above the appliance for ventilation.
Does ceiling height affect kitchen wall unit placement?
Yes. For 9-foot or higher ceilings, you can raise the wall unit bottom to 56–58 inches and add a bulkhead, or keep the standard 54-inch height and extend the cabinets to the ceiling with a valance or open shelving. For 7-foot or lower ceilings, lower the bottom of the wall units to 50–52 inches and use shallower 12-inch deep cabinets to avoid a cramped, top-heavy look.
Should kitchen wall units align with appliances?
Yes, for a cohesive look and proper function. Align the bottom of the wall cabinet with the top of a built-in microwave or wall oven, or with the bottom of a range hood's canopy. Built-in appliances require custom cabinet sizing, so always measure the appliance’s exact dimensions before ordering cabinets.
Can I mix different wall unit heights in one kitchen?
Absolutely. Mixing heights is a popular 2026 design trend: for example, install standard 54-inch high cabinets above the sink and cooktop for easy access, and lower 48-inch cabinets above a desk or prep area for seated use. This adds visual interest while improving functionality for different tasks.
Conclusion
Getting your kitchen wall unit height right is one of the simplest, highest-impact upgrades you can make to your space, whether you’re doing a full renovation or just swapping out old cabinets. By balancing ergonomic comfort, aesthetic proportion, and your household’s unique needs, you’ll create a space that’s easy to use every day and feels cohesive and intentional for years to come.
Once your wall units are installed at the perfect height, you can use the extra cleared counter space to set up a small home beverage station — our roundup of home wine making tools has everything you need to craft your own wine, beer, or cider at home. If you’re looking for all the supplies you need to outfit your new kitchen, including storage for your beverage station gear, our guide to wine making supplies online covers durable, affordable options for every budget.
 Standard 54-inch wall unit height works for most 8-foot ceiling kitchens with average-height users.
Credit: www.familyhandyman.com
Standard 54-inch wall unit height works for most 8-foot ceiling kitchens with average-height users.
Credit: www.familyhandyman.com
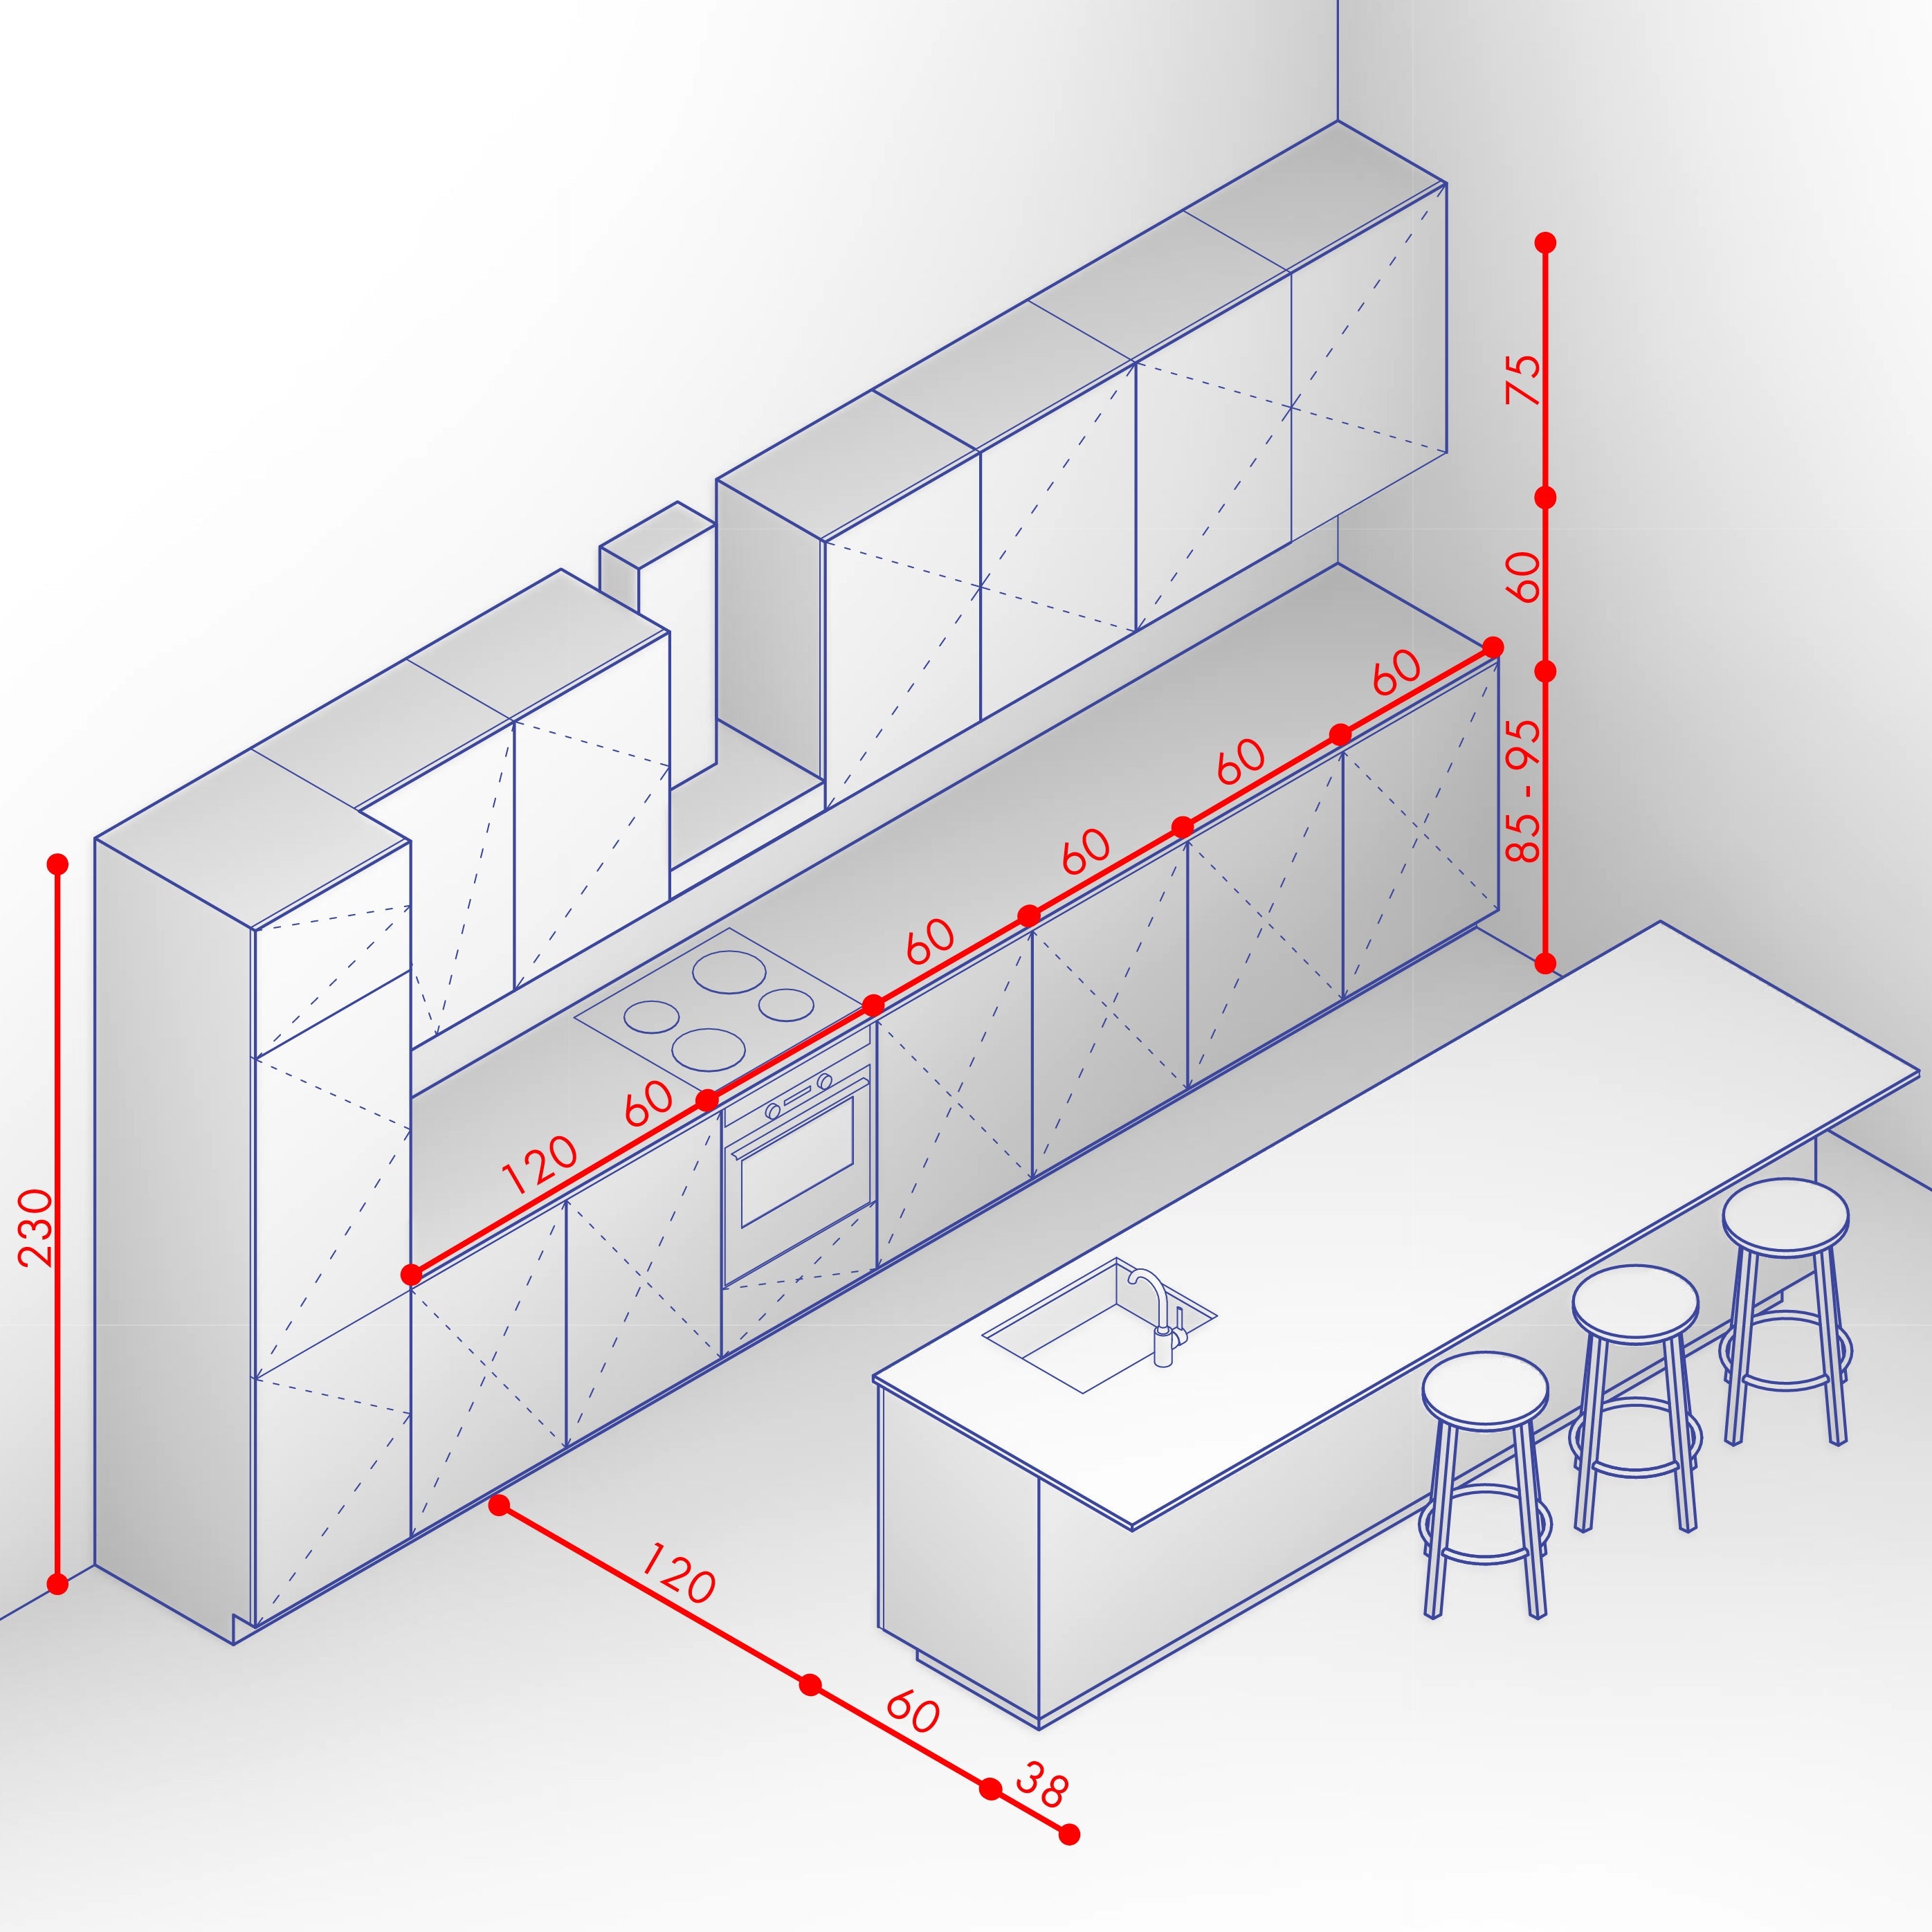 3D render demonstrating the 18-inch gap between countertop and wall units for optimal reach.
Credit: postdigitalarchitecture.com
3D render demonstrating the 18-inch gap between countertop and wall units for optimal reach.
Credit: postdigitalarchitecture.com
 Elevation diagram marking the 54-inch floor-to-cabinet and 18-inch countertop-to-cabinet standard measurements.
Credit: www.create-enjoy.com
Elevation diagram marking the 54-inch floor-to-cabinet and 18-inch countertop-to-cabinet standard measurements.
Credit: www.create-enjoy.com
Common Mistakes To Avoid
Setting the right height for your kitchen wall units is crucial, but many people stumble over avoidable errors that can cost time, money, and frustration to fix after installation. These mistakes impact everything from daily comfort to your kitchen’s long-term resale value, so it’s worth reviewing them before you make any final measurements.
Too High Or Too Low Placement
Placing wall units too high can make it hard to reach items, especially for shorter individuals or kids, forcing you to pull out a step stool for everyday staples like cereal, spices, or coffee mugs multiple times a day. On the other hand, units set too low can cramp your countertop workspace, create awkward clearance for tall appliances like stand mixers or blenders, and even lead to bumped heads when reaching for the sink or cooktop. Think about your daily kitchen activities: how often do you reach for those upper shelves? Adjust the height so that 90% of the items you use daily are within easy reach without a step stool. This small adjustment can drastically improve your kitchen’s usability and reduce daily frustration, especially for households that cook frequently.
Ignoring User Needs
Every kitchen user is different. Ignoring the height and reach of the people who will actually use the kitchen is one of the most common installation errors, and it’s almost always rooted in relying on generic "average" measurements instead of real-world household data. It’s not just about national averages; consider your family’s unique needs, including kids, older adults, or household members with mobility challenges. Have you ever struggled to open a cabinet or felt uncomfortable bending over to grab something? Those small, daily moments highlight the importance of tailoring unit height to real users. Ask yourself: Who uses the kitchen most often, and what are their habits? If you have a household member who uses a wheelchair, prioritize the ADA accessibility guidelines for maximum reach height, and consider adding pull-down shelves to upper cabinets to reduce overhead reaching for all users.
Overcrowding Wall Space
Filling every inch of wall space with cabinets might seem like the best way to maximize storage, but it can overwhelm your kitchen visually and practically. Overcrowded walls block natural light, reduce the sense of openness, and make the space feel smaller and cluttered, even if you have a large kitchen. Instead, balance storage needs with open areas to keep the kitchen light and inviting. Consider leaving a section of wall space free for open shelves, a small window, or a decorative tile backsplash that peeks out above the counter. This approach also makes cleaning easier, as there are fewer cabinet fronts to dust and fewer tight spaces for grease and grime to build up over time.
Frequently Asked Questions
What is the ideal height for kitchen wall units for most households?
For households with users between 5'4" and 6'0" tall, the ideal height is 54 inches from the finished floor to the bottom of the wall cabinet, with an 18-inch gap between the countertop and the cabinet. This aligns with NKBA ergonomic guidelines and works for standard 8-foot ceilings and 36-inch countertops.
How far should wall units be from the countertop?
The standard gap is 18 inches, but you can adjust this to 16–17 inches for shorter users, or 19–20 inches for taller users, to reduce reaching or bending. If you’re installing a microwave in the wall unit, leave an extra 2–4 inches of clearance above the appliance for proper ventilation.
Does ceiling height affect kitchen wall unit placement?
Yes. For 9-foot or higher ceilings, you can raise the wall unit bottom to 56–58 inches and add a bulkhead, or keep the standard 54-inch height and extend the cabinets to the ceiling with a valance or open shelving for extra storage. For 7-foot or lower ceilings, lower the bottom of the wall units to 50–52 inches and use shallower 12-inch deep cabinets to avoid a cramped, top-heavy look.
Should kitchen wall units align with appliances?
Yes, for a cohesive look and proper function. Align the bottom of the wall cabinet with the top of a built-in microwave or wall oven, or with the bottom of a range hood's canopy. Built-in appliances require custom cabinet sizing, so always measure the appliance’s exact dimensions before ordering cabinets to ensure a perfect fit.
Can I mix different wall unit heights in one kitchen?
Absolutely. Mixing heights is a popular 2026 design trend that improves functionality: for example, install standard 54-inch high cabinets above the sink and cooktop for easy access while cooking, and lower 48-inch cabinets above a desk or prep area for seated use. This adds visual interest while tailoring storage to different tasks and users.
Conclusion
Getting your kitchen wall unit height right is one of the simplest, highest-impact upgrades you can make to your space, whether you’re doing a full renovation or just swapping out old cabinets. By balancing ergonomic comfort, aesthetic proportion, and your household’s unique needs, you’ll create a space that’s easy to use every day and feels cohesive and intentional for years to come.
Once your wall units are installed at the perfect height, you can use the extra cleared counter space to set up a small home beverage station — our roundup of home wine making tools has everything you need to craft your own wine, beer, or cider at home. If you’re looking for all the supplies you need to outfit your new kitchen, including storage for your beverage station gear, our guide to wine making supplies online covers durable, affordable options for every budget.